Tying a knot is an essential outdoor skill that you should not take for granted. Even if you are not an outdoorsy person, it can help you in many practical ways and also save your life in an emergency. You may have learned some of these knots in school, but many of them are essential that you have never heard before.
To start with, you have to be familiar with the few terms that we will be using in the course of this article. Here are some of them.
- Knot – is a splice or fastening produced by interlinking one or more ropes or any flexible material together. When the knot is tightened, it should be able to hold on its own.
- Hitch – is like a knot but includes another object like a post, a ring, or a stick, and sometimes another rope. If tied correctly, the hitches will be kept in place, or slide depending on what you want to do.
- Lashing – is a more complicated hitch because its goal is to hold many objects together.
An excellent knot can help you during emergencies, especially in a survival situation or when employing first-aid. To do all of this, you need to know how to tie a knot. Follow this easy-to-follow guide on what to do with the rope here.
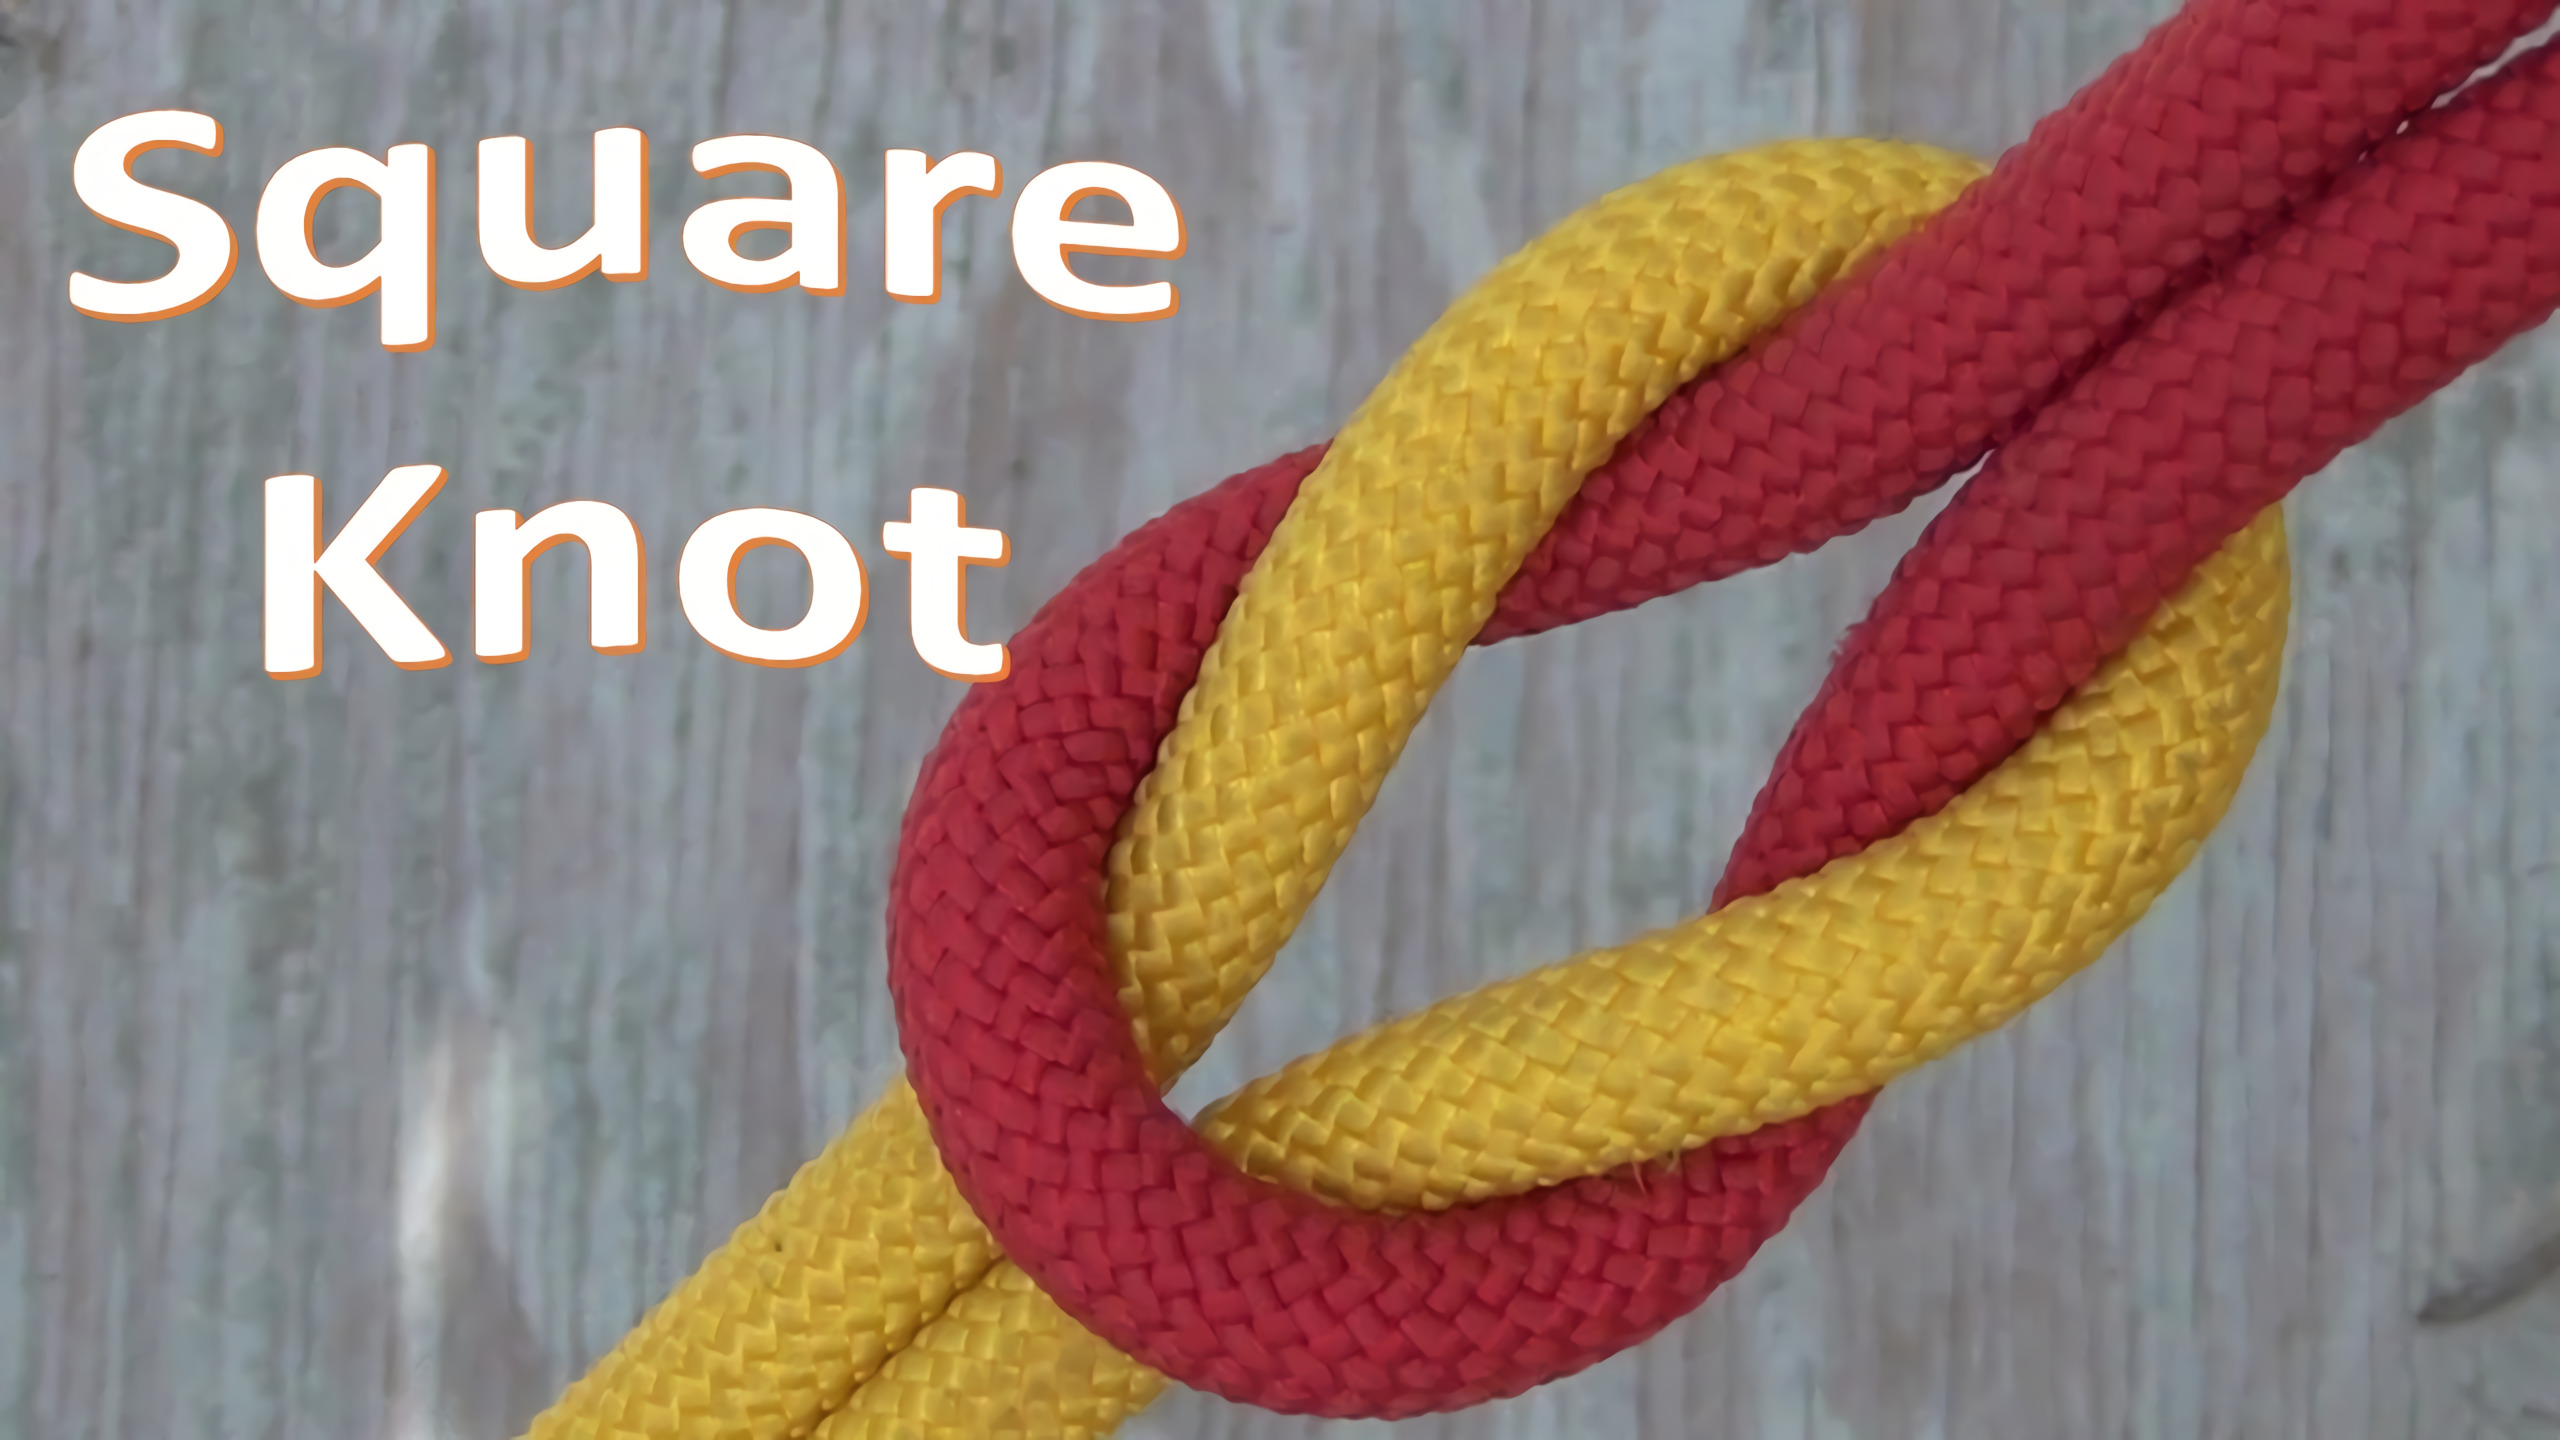
1. SQUARE KNOT
This type of knot is the most basic when connecting lines or tying knots and used when tying two ropes to make a longer rope, or when you want to tie a bundle of objects like firewood together.
Tying a solid square knot is easy as you only need to lap one rope over the other in the right over left format and then under the other. Repeat the pattern in a reverse direction, meaning left over right and then underneath. To check if you have done it correctly; your working end should be beside the standing end of the rope, and there is no crisscrossing.
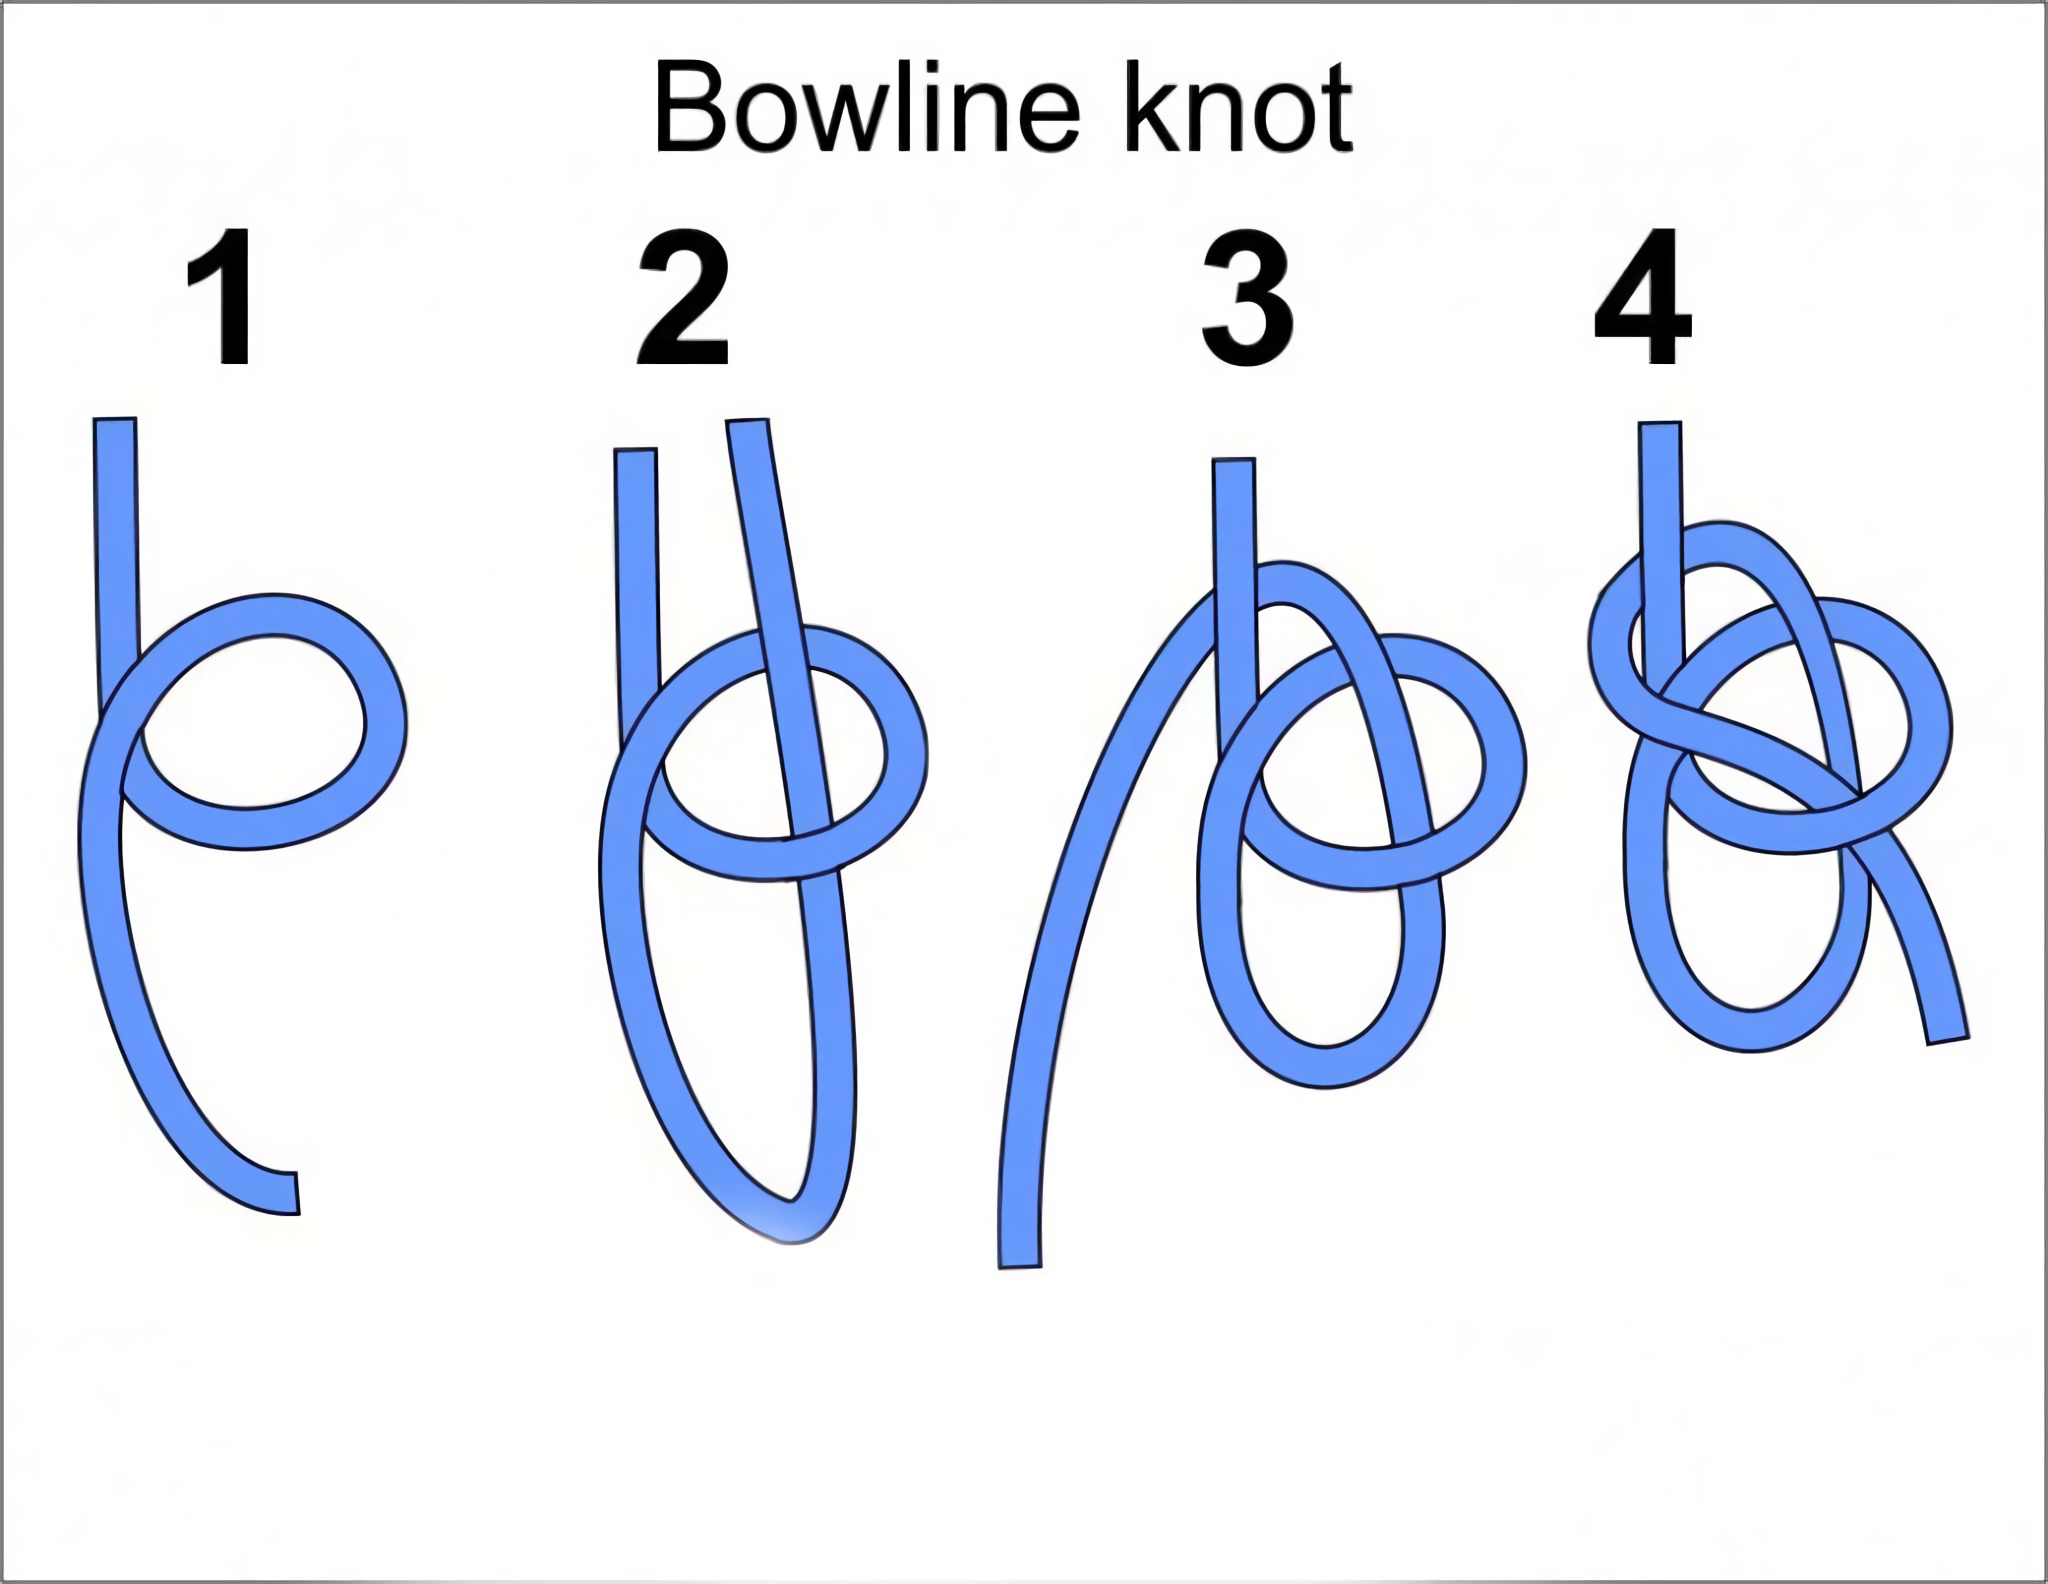
2. THE BOWLINE
You can do this knot by creating a loop that does not expand or shrink at the end of the rope. When you were a child or in summer camp you learned this through a short poem that goes: the rabbit came out of the hole, hopped in front of the tree, then went behind the tree and back to his hole.
To translate: make a loop at the end of your rope, pass the working end of the string into the circle and behind the line and pass the working end again through the original loop. You have to keep the shape of the second loop; that is your bowline loop. To tighten the bowline, you need to pass the rope into the loop and pull it.
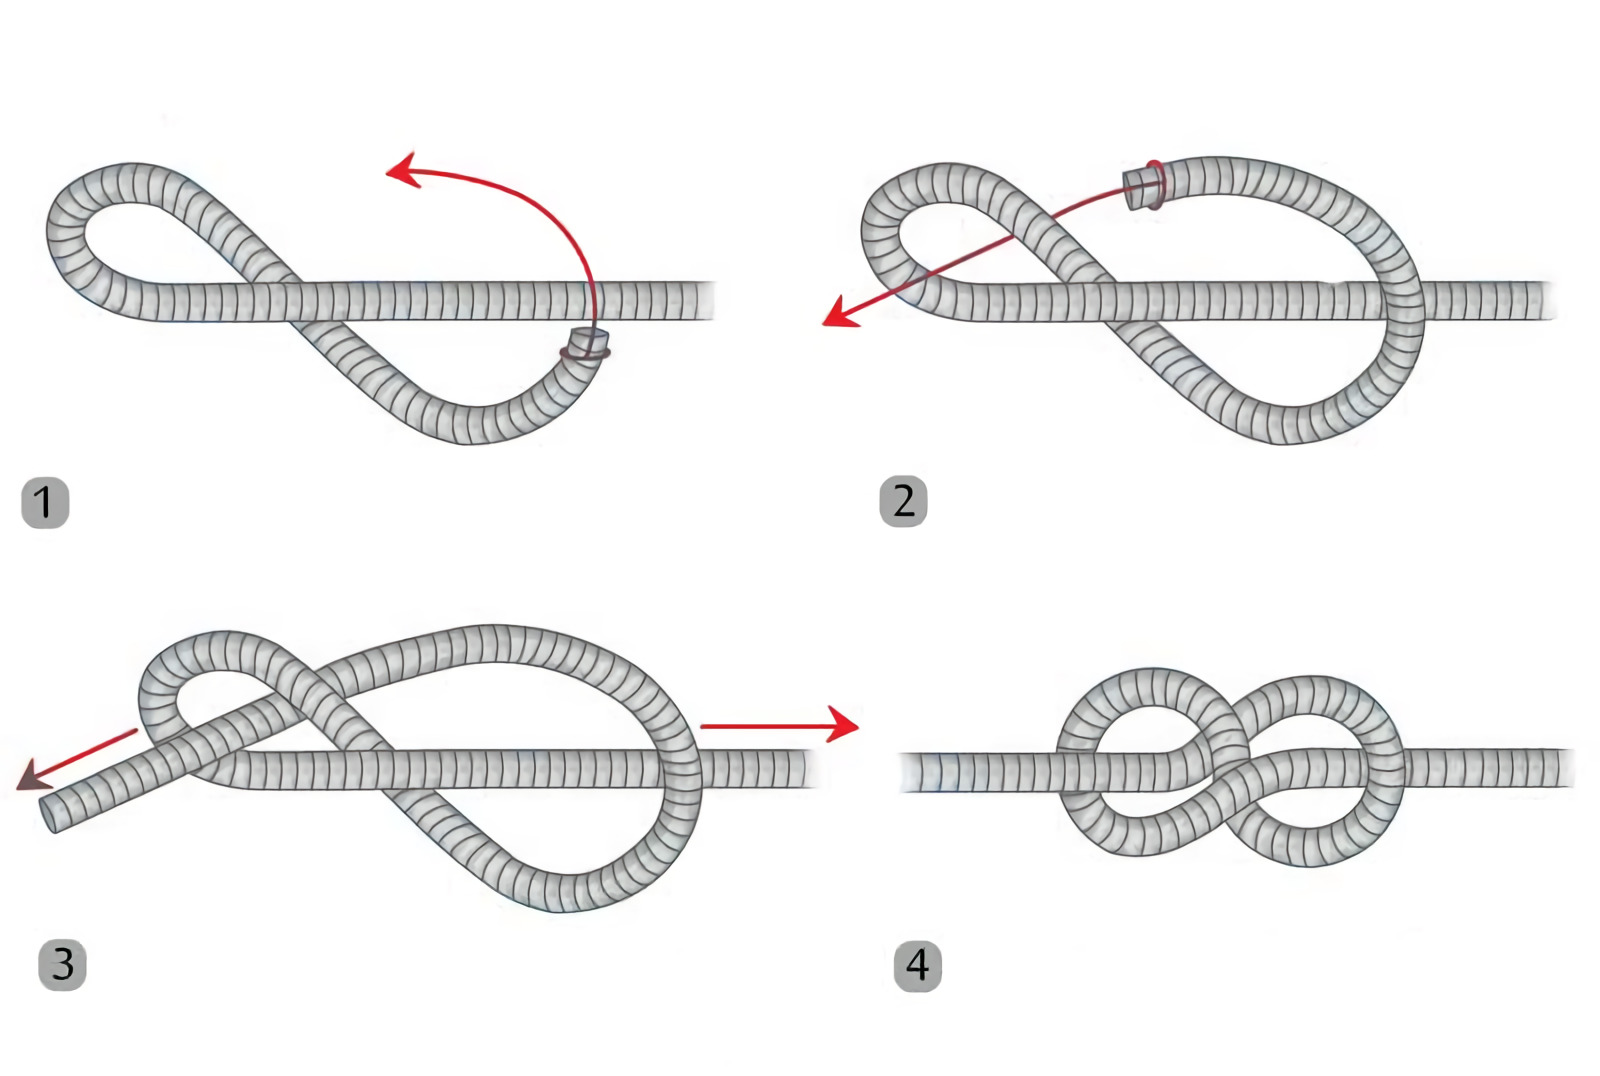
3. FIGURE EIGHT
A figure-eight is used to create a stopper when you need one. This type of knot is also known as the Flemish bend. You pass your free end of the rope over itself to create a loop. Continue doing this under the string and around and tighten the knot by passing its working end through your original circle.
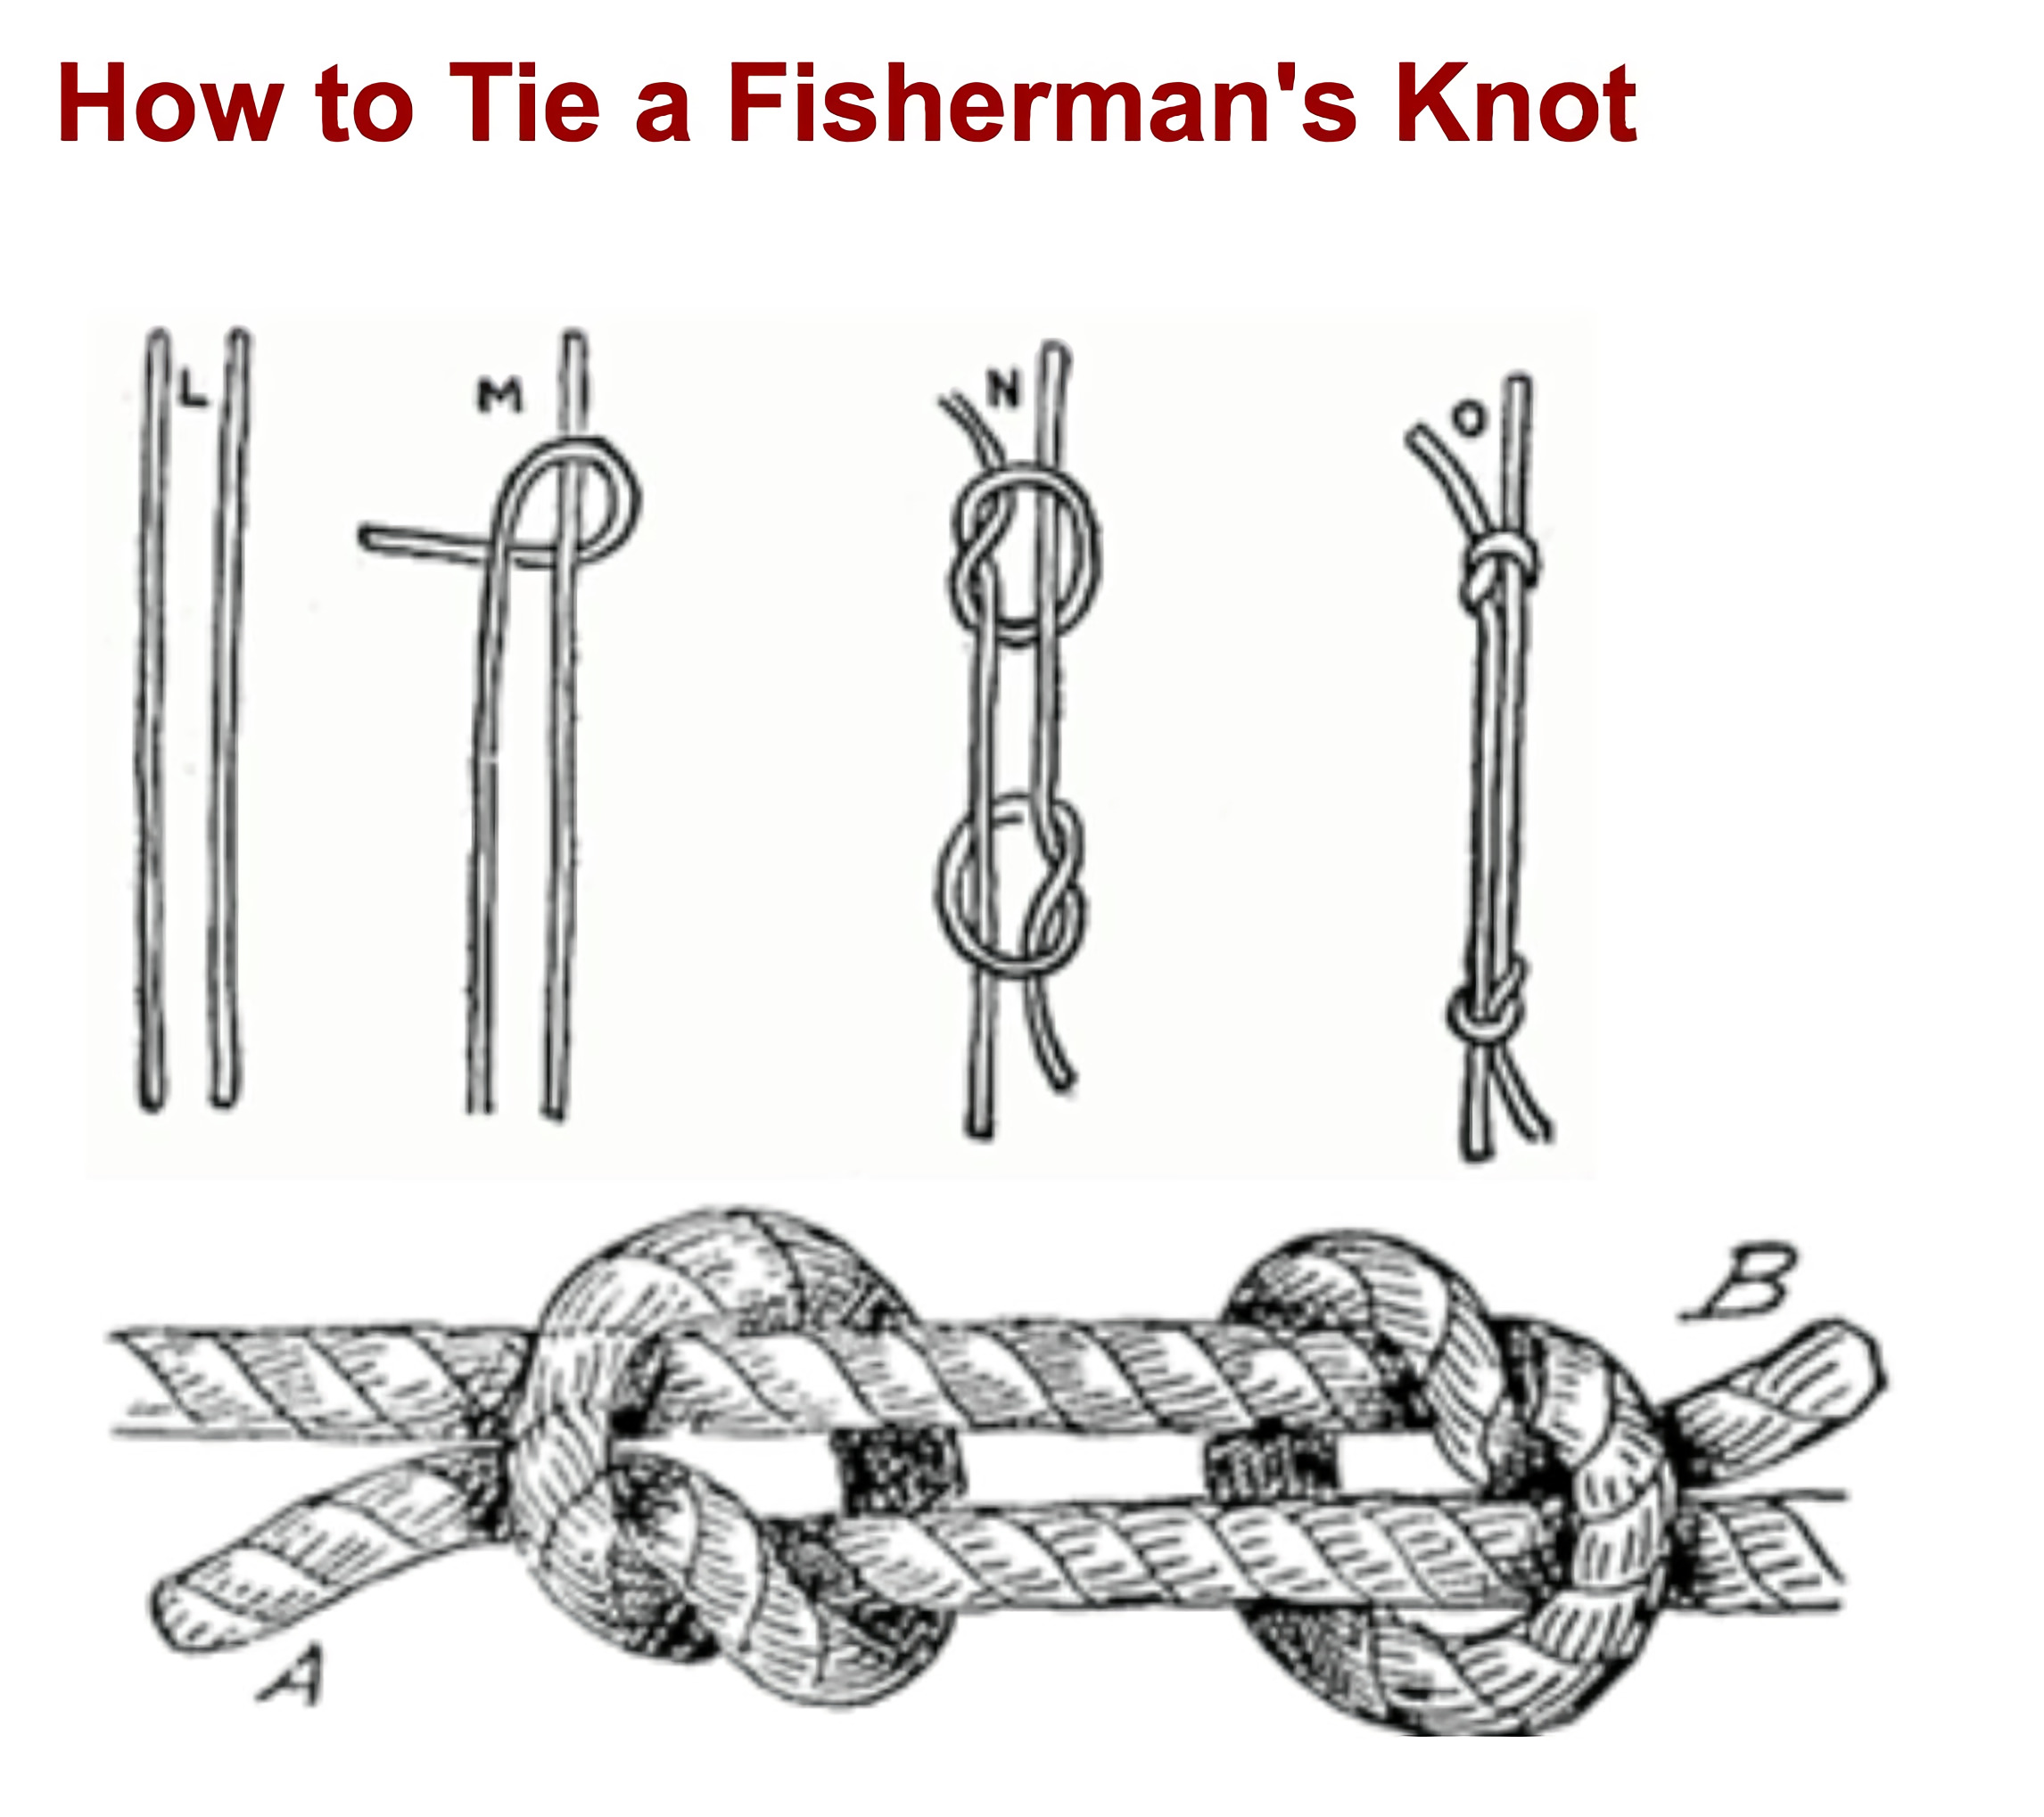
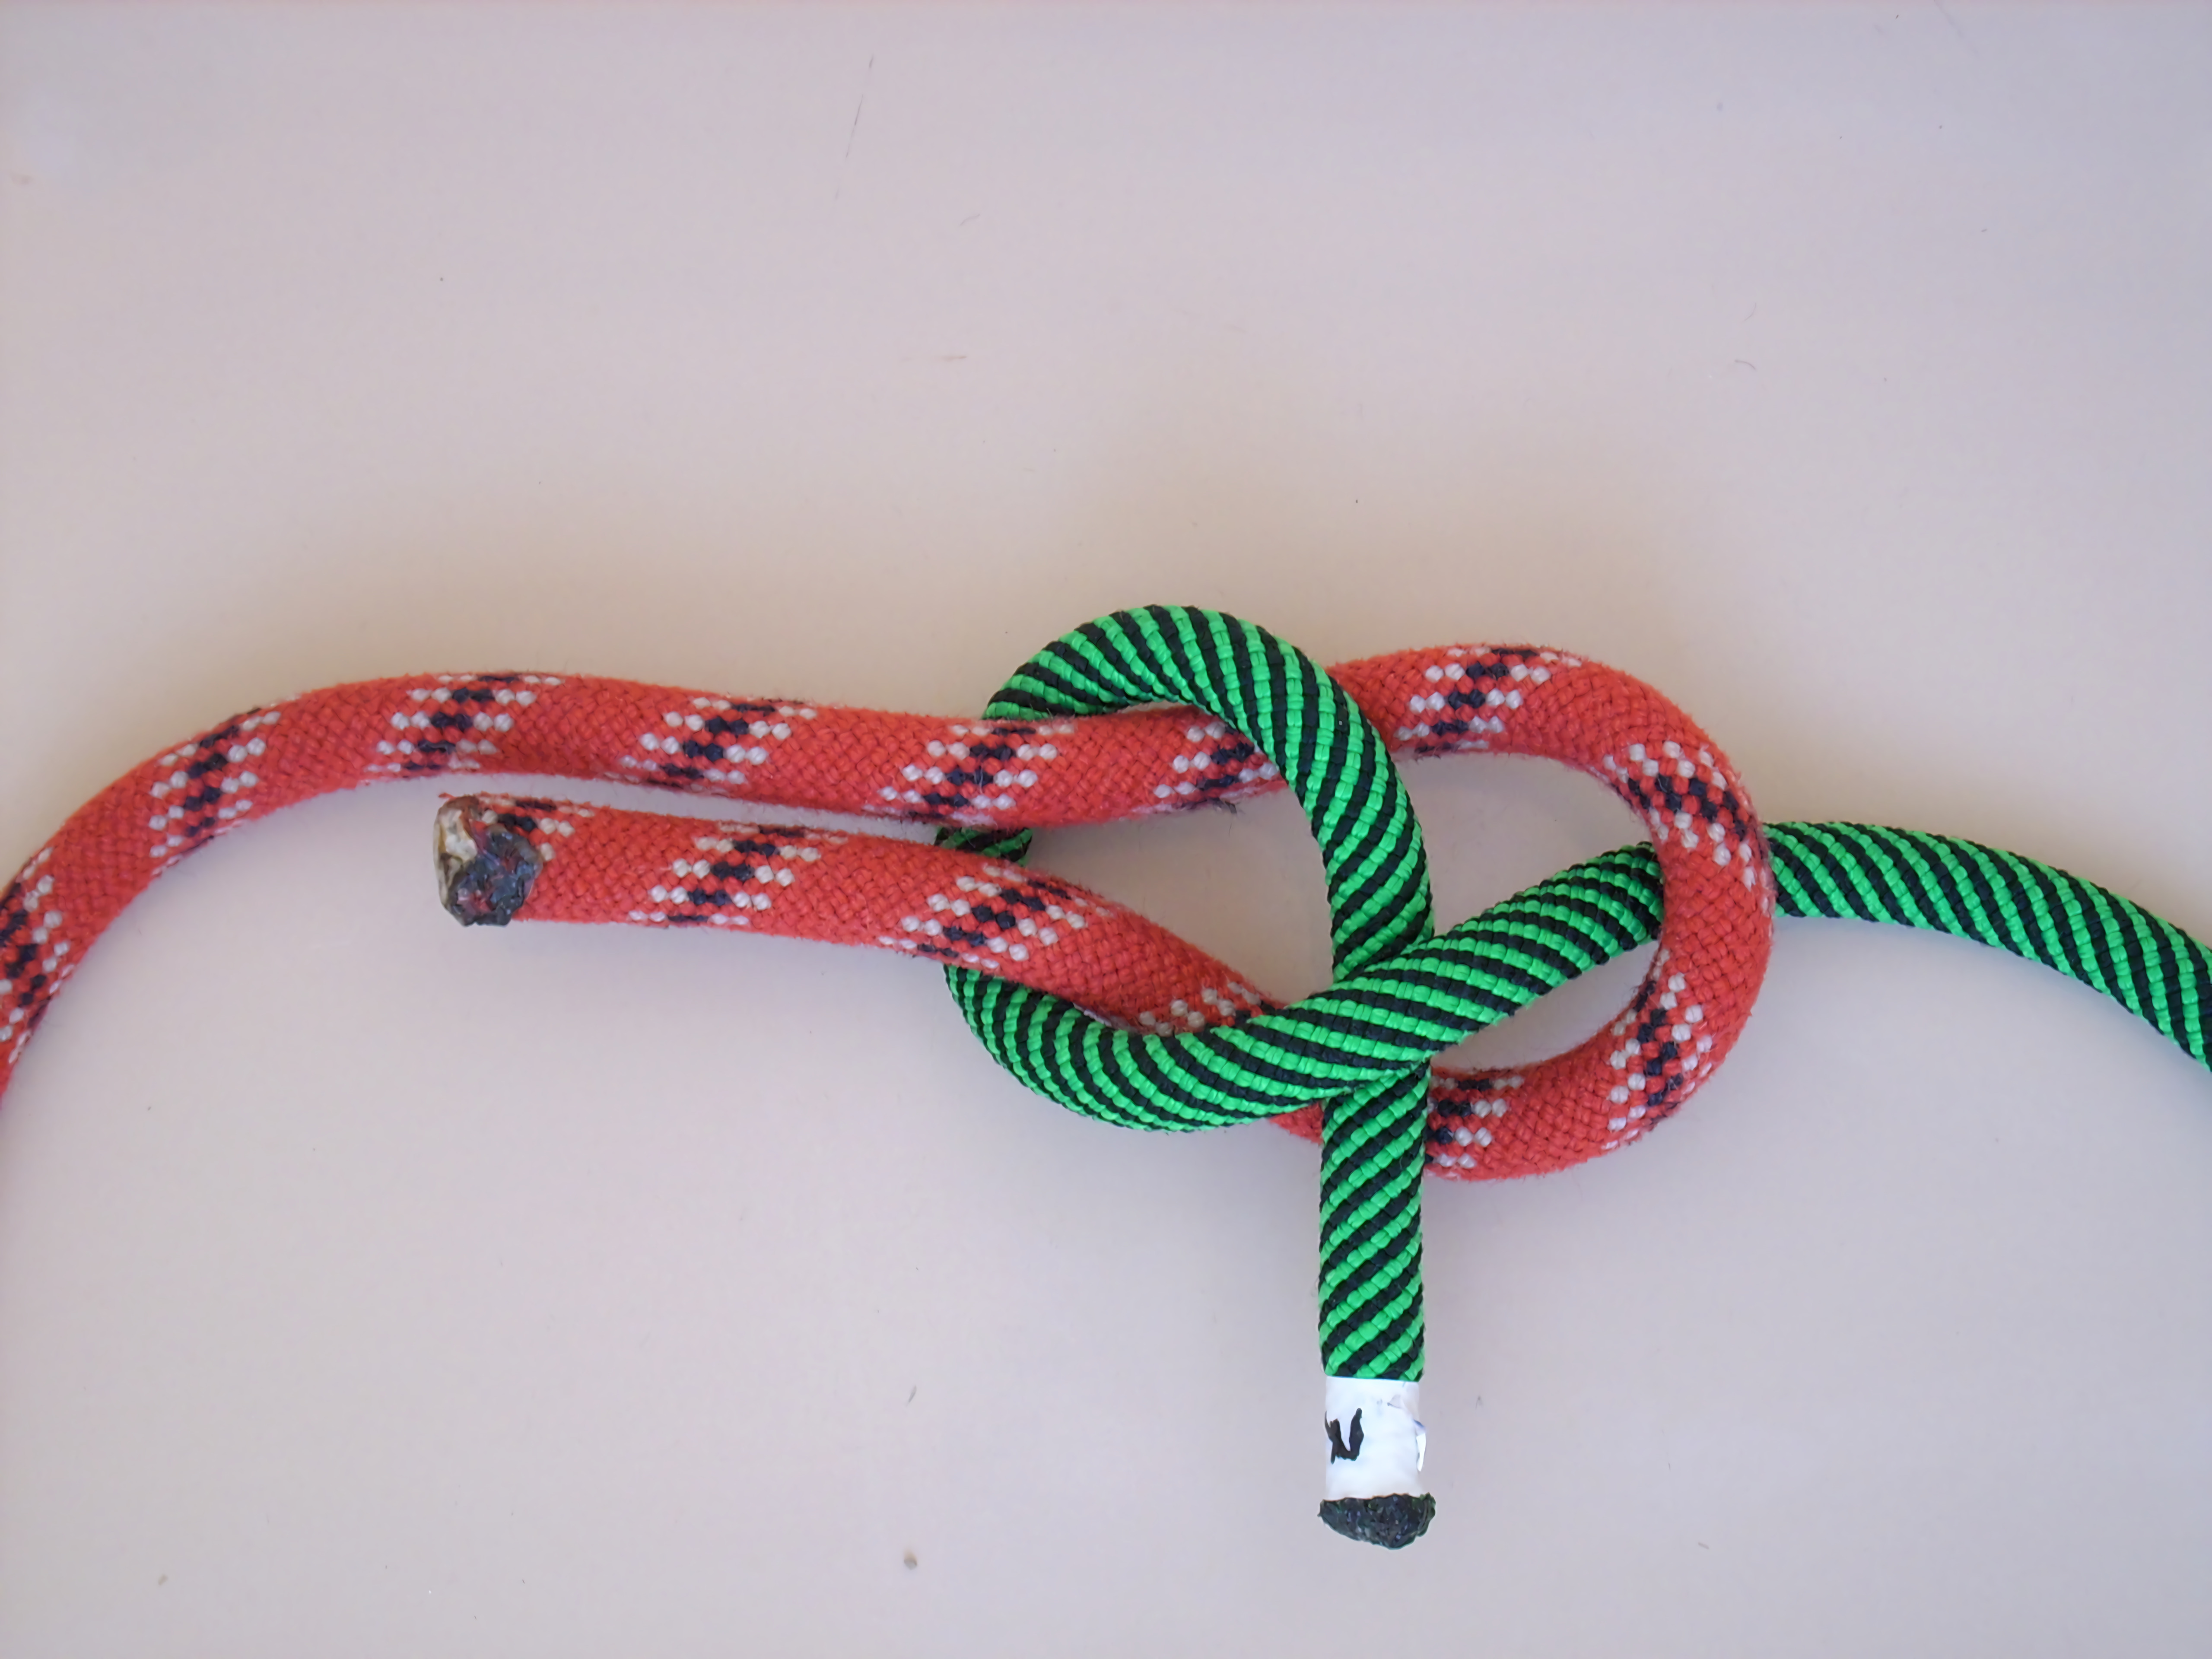
4. FISHERMAN’S KNOT
Just like its name, the knot is used on fishing lines. To do this, you have to pass the free end of the rope around the object that you need to secure through the loop of the fishhook. Wrap the free end of the rope around the other side of the rope about five or six times.
Pass the end of this rope through the triangular opening beside the object that you need to secure and pass the free end of this line through the large loop that was created when you went through the small triangle.
If you are doing this with a fishing line, spit on the line to lubricate it. If the line is not lubricated, the friction could cause heat damage to the rope. Tighten the created knot and cut the extra rope if you have to.
5. SHEET BEND
The sheet is a favorite of most people and is more of a bend rather than a knot and connects one line to another. You can join different types of ropes together using this knot regardless of their thickness.
To do this, you need to make a “J” shape, which looks like a fish hook of the more slippery line. Pass the other rope through the hook shape and wrap it around the entire J-hook once and tuck the smaller line in between itself and the other. If you have the same type and diameter of the rope, you will see that the sheet bend looks the same as a square knot.
If you are using a piece of fabric or something like it, you also need to shape the material into the same “J” shape and run the other rope through the loop and around it.
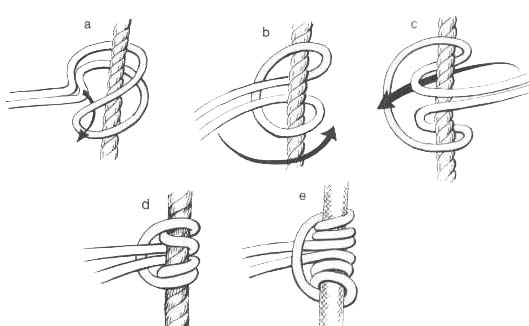
6. TWO HALF HITCHES
You can also use this type of knot to secure a rope around trees and posts. This knot is also used to secure a rope in itself as you would in a trucker’s hitch. It is easy to tie a half hitch; hence, it is commonly used in tying hammocks or traps in shelters.
After wrapping the rope around the steady end and through the loop that was created to form the first half hitch, wrap the rope around the line again to make the same second half hitch. After pulling it tight, you will have two half hitches that are next to each other. For more security, you can do an overhand knot using the tag end of the rope to keep the double half hitches from sliding.
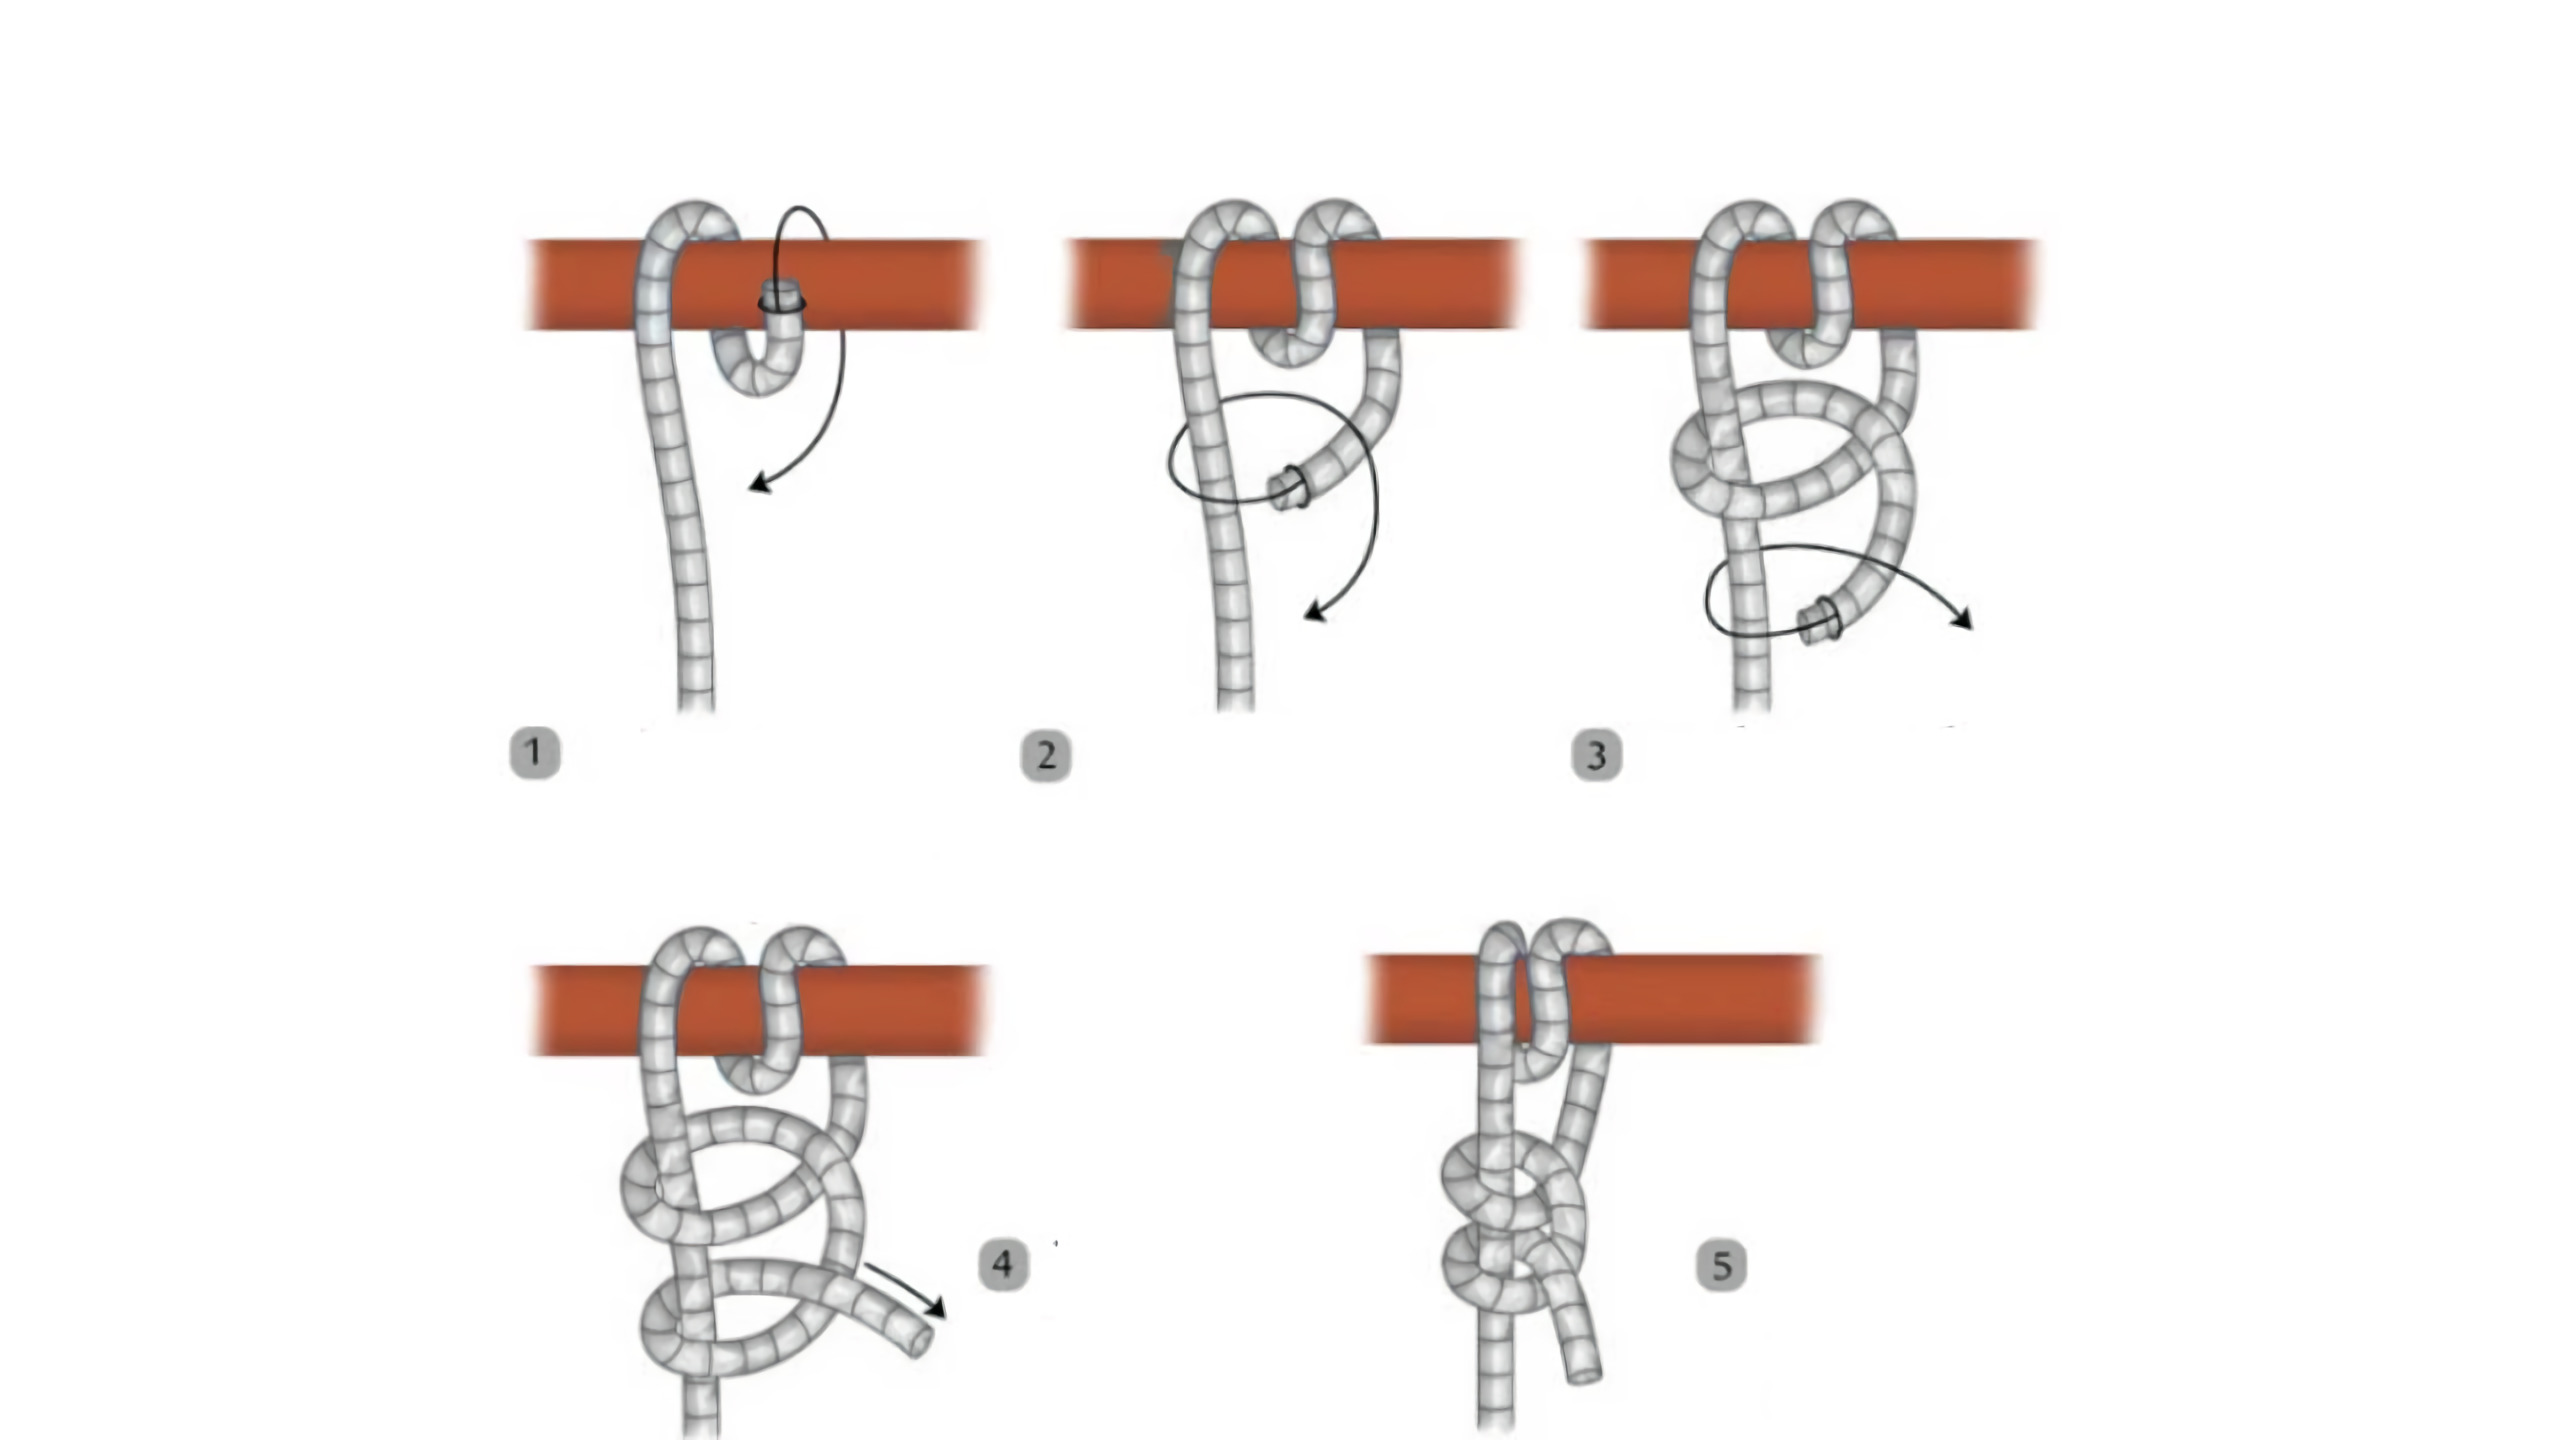
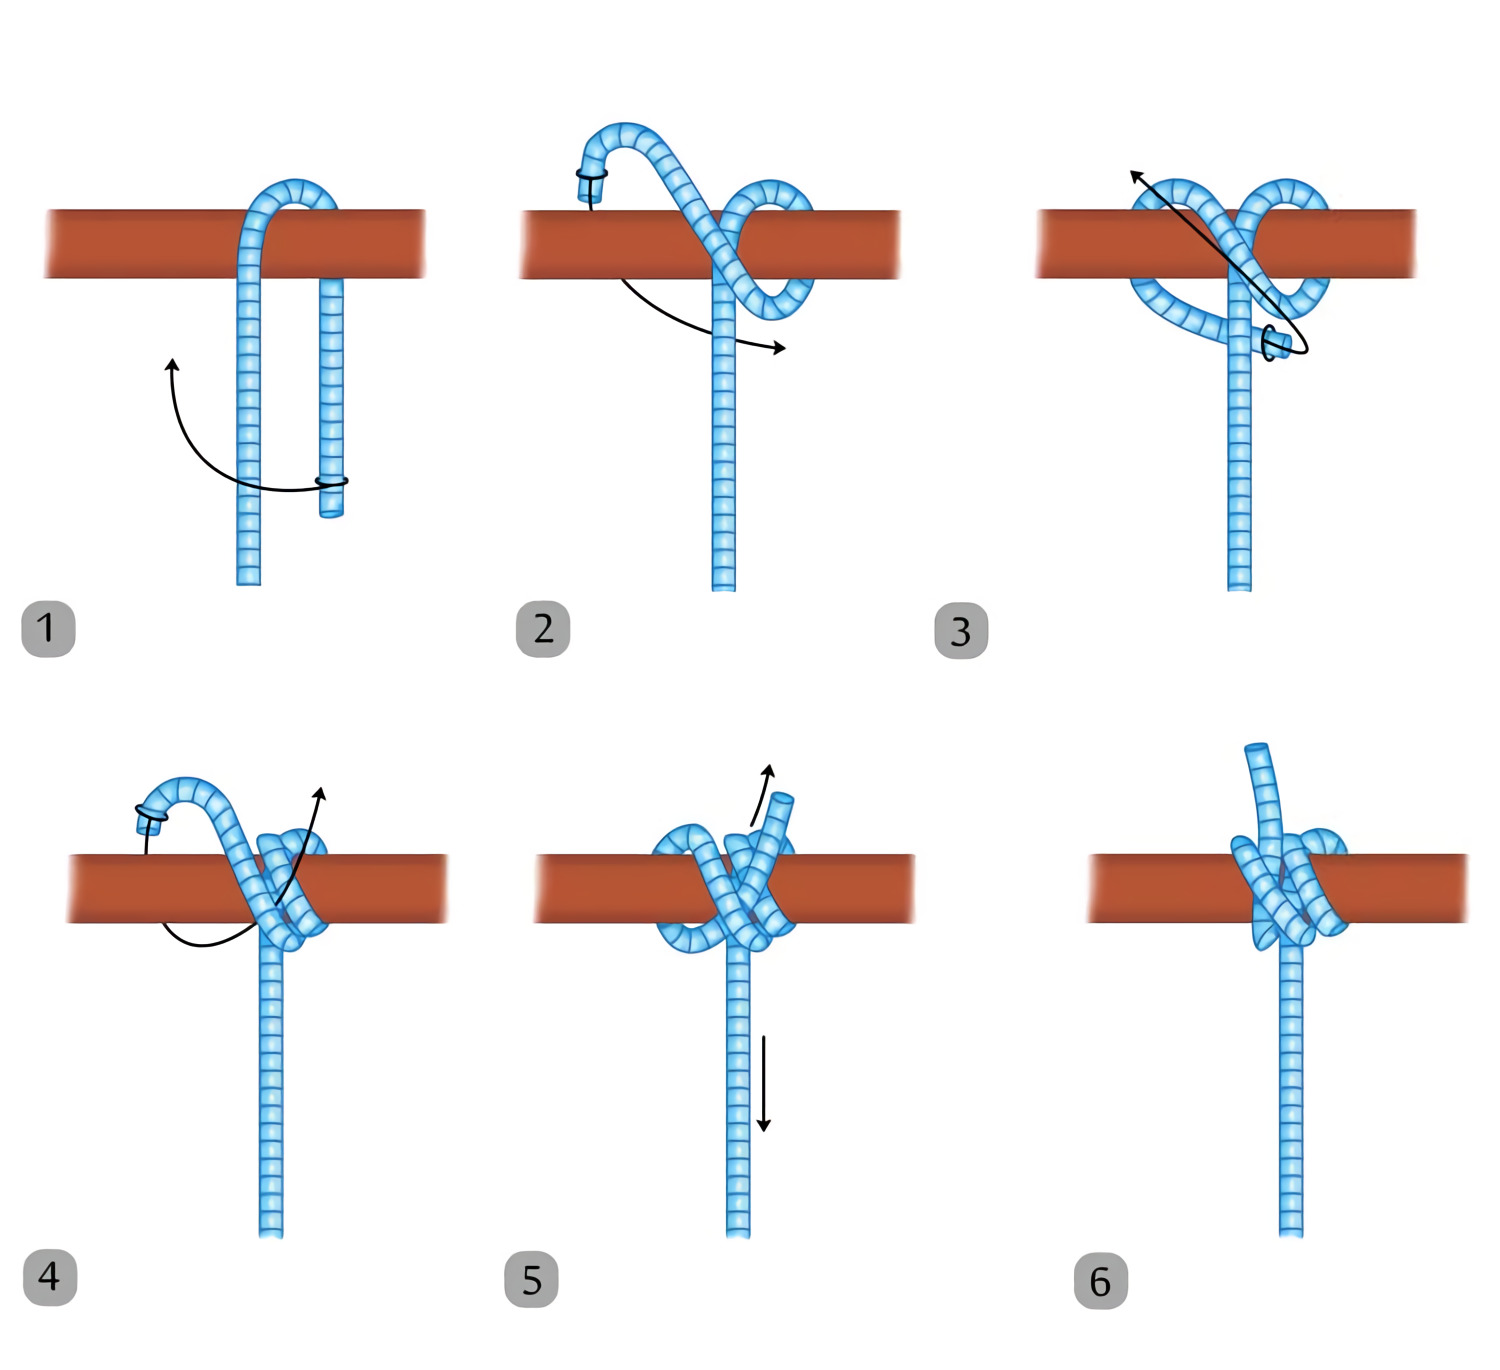
7. TAUT LINE HITCH
The taut-line hitch is used as a slide that loosens or tighten a loop in the rope; the grip it creates will remain as long as there is tension on the firm side of the loop.
To tie a taut-line hitch, you need to create a loop by wrapping the rope around a solid object. Wrap the cord around the mainline and draw the free end of the rope through the loop that you have created. Cinch these wraps until they are tight and pull the standing cord. The taut-line hitch should be able to grasp the loaded line.
8. CLOVE HITCH
The clove hitch is the easiest knot to tie and is used to secure the rope to a post or a tree quickly. The only downside is that it needs another knot as reinforcement.
To do the clove hitch onto a tree, you have to loop the rope around it. Then create another loop and insert the free end of the rope under this second loop to secure it. If you use a post, create a loop, slide this over the post, and another loop to tighten the rope.
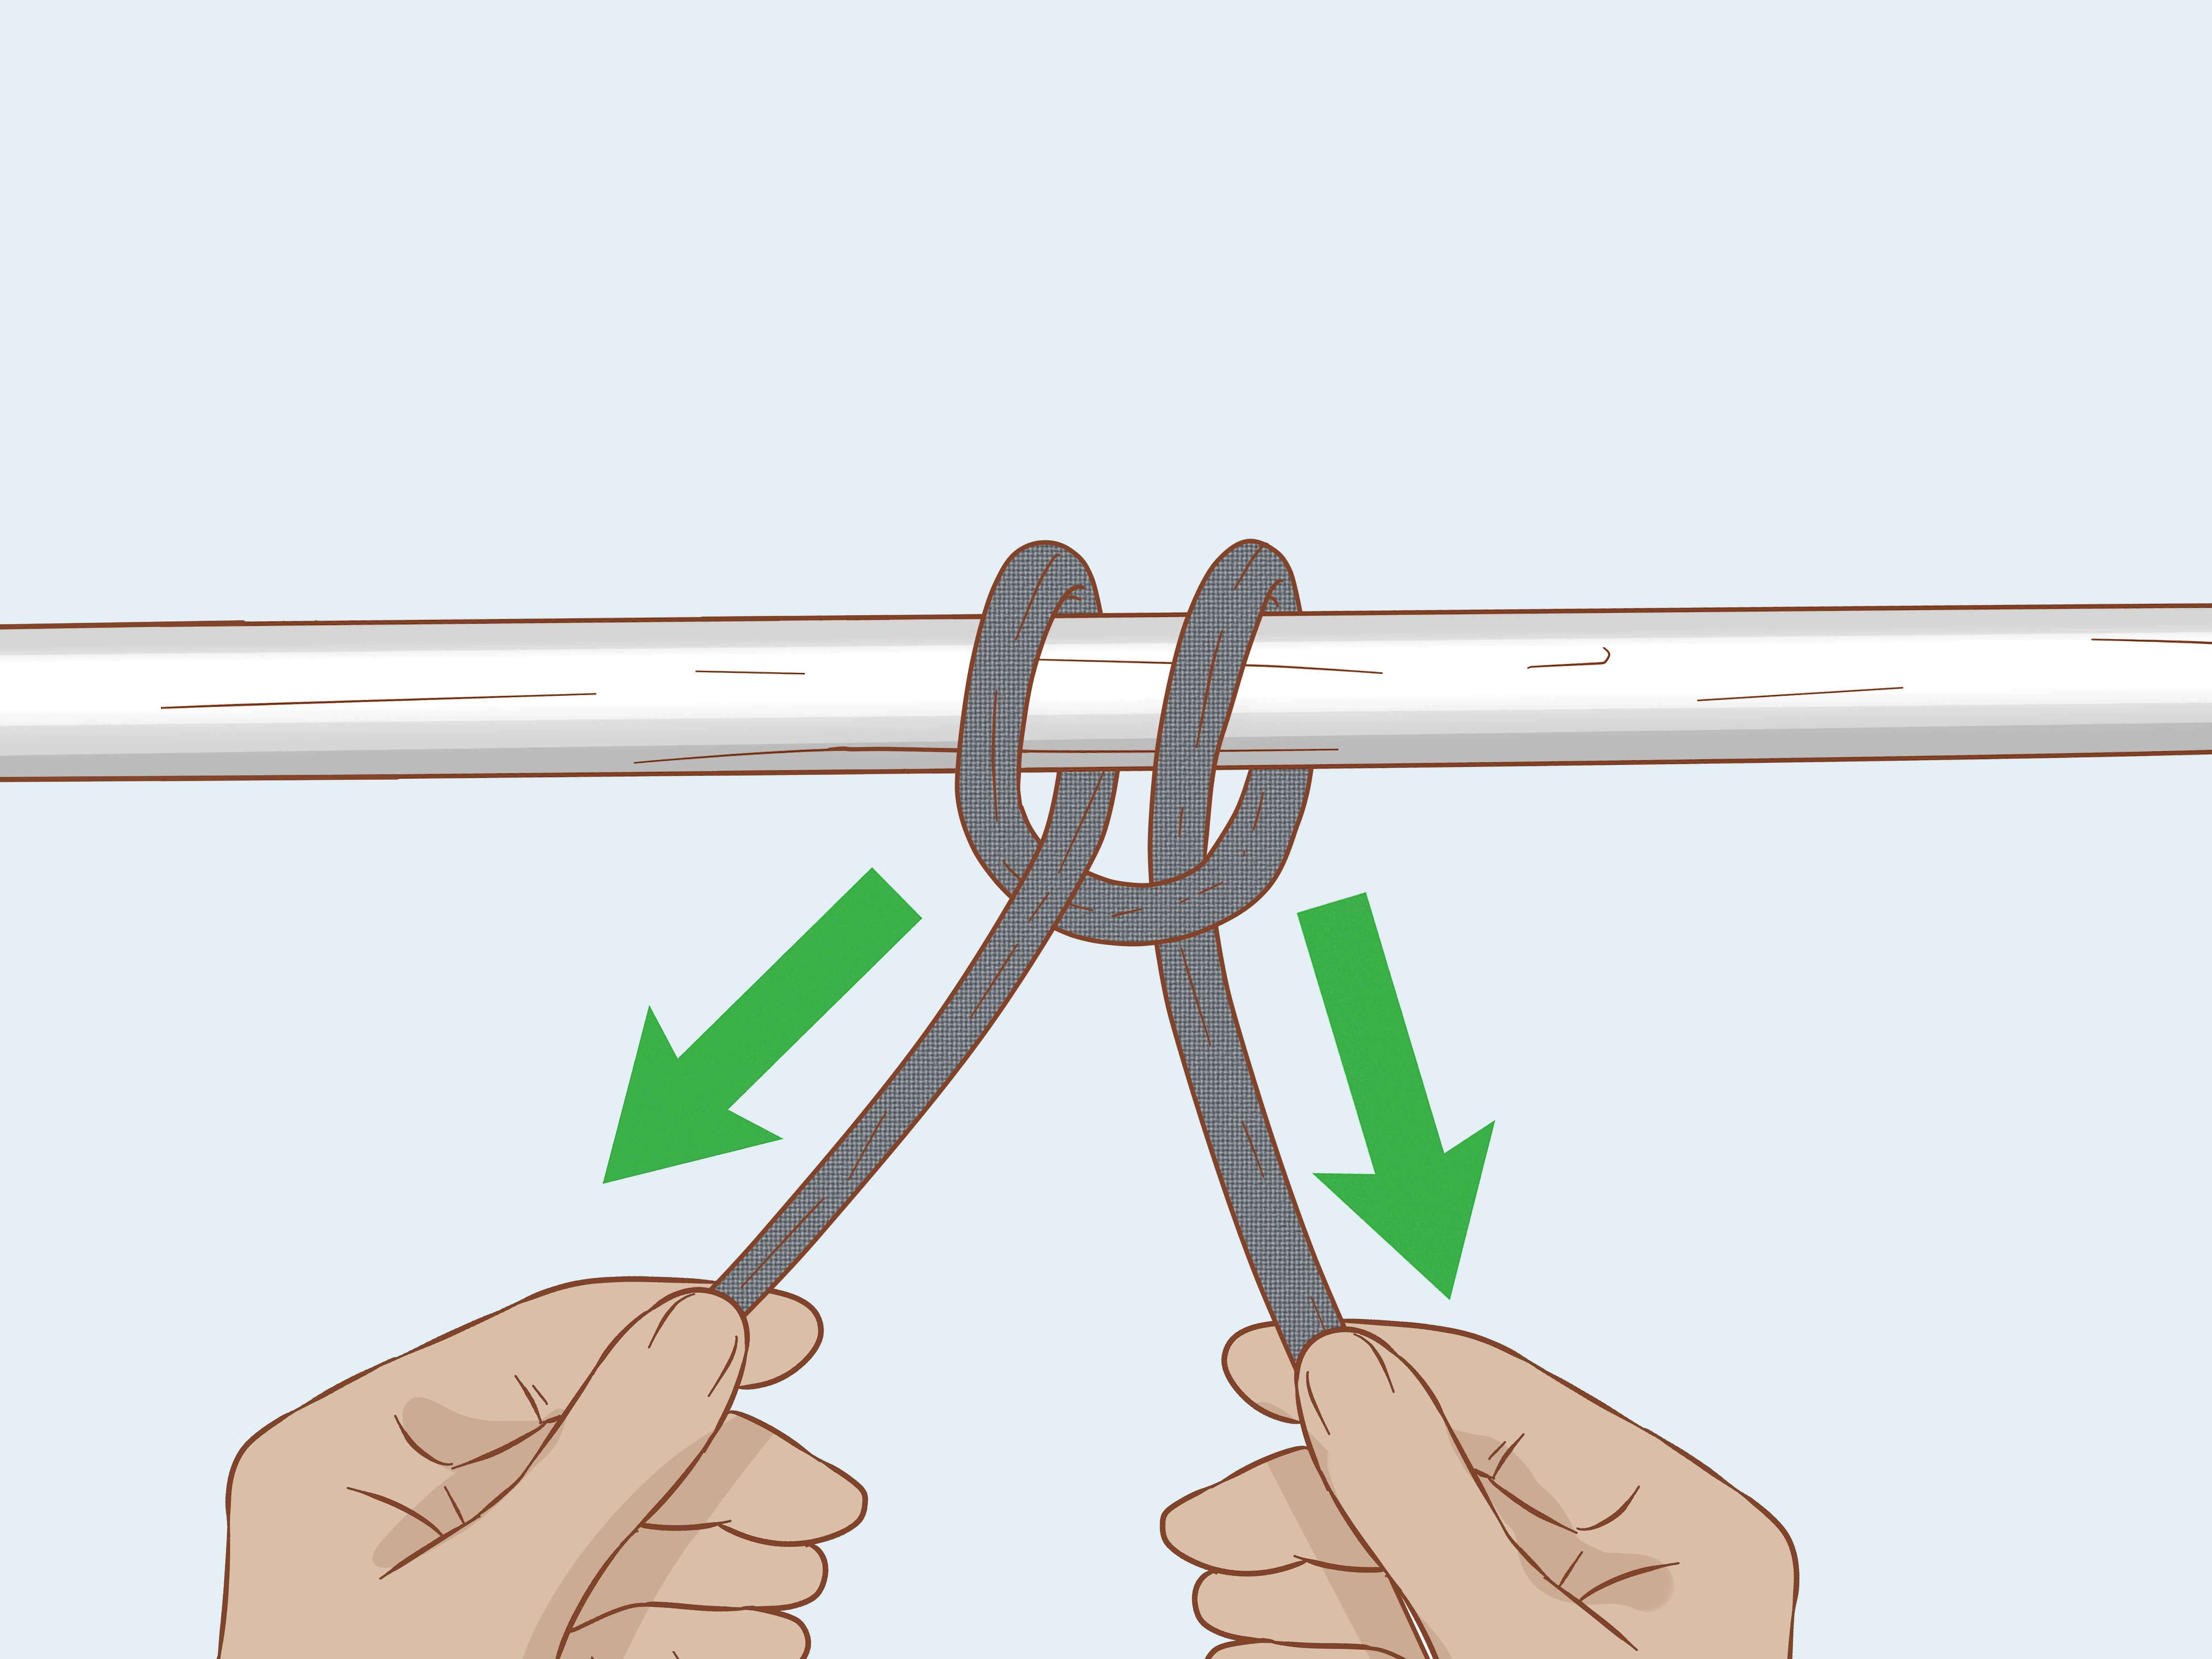
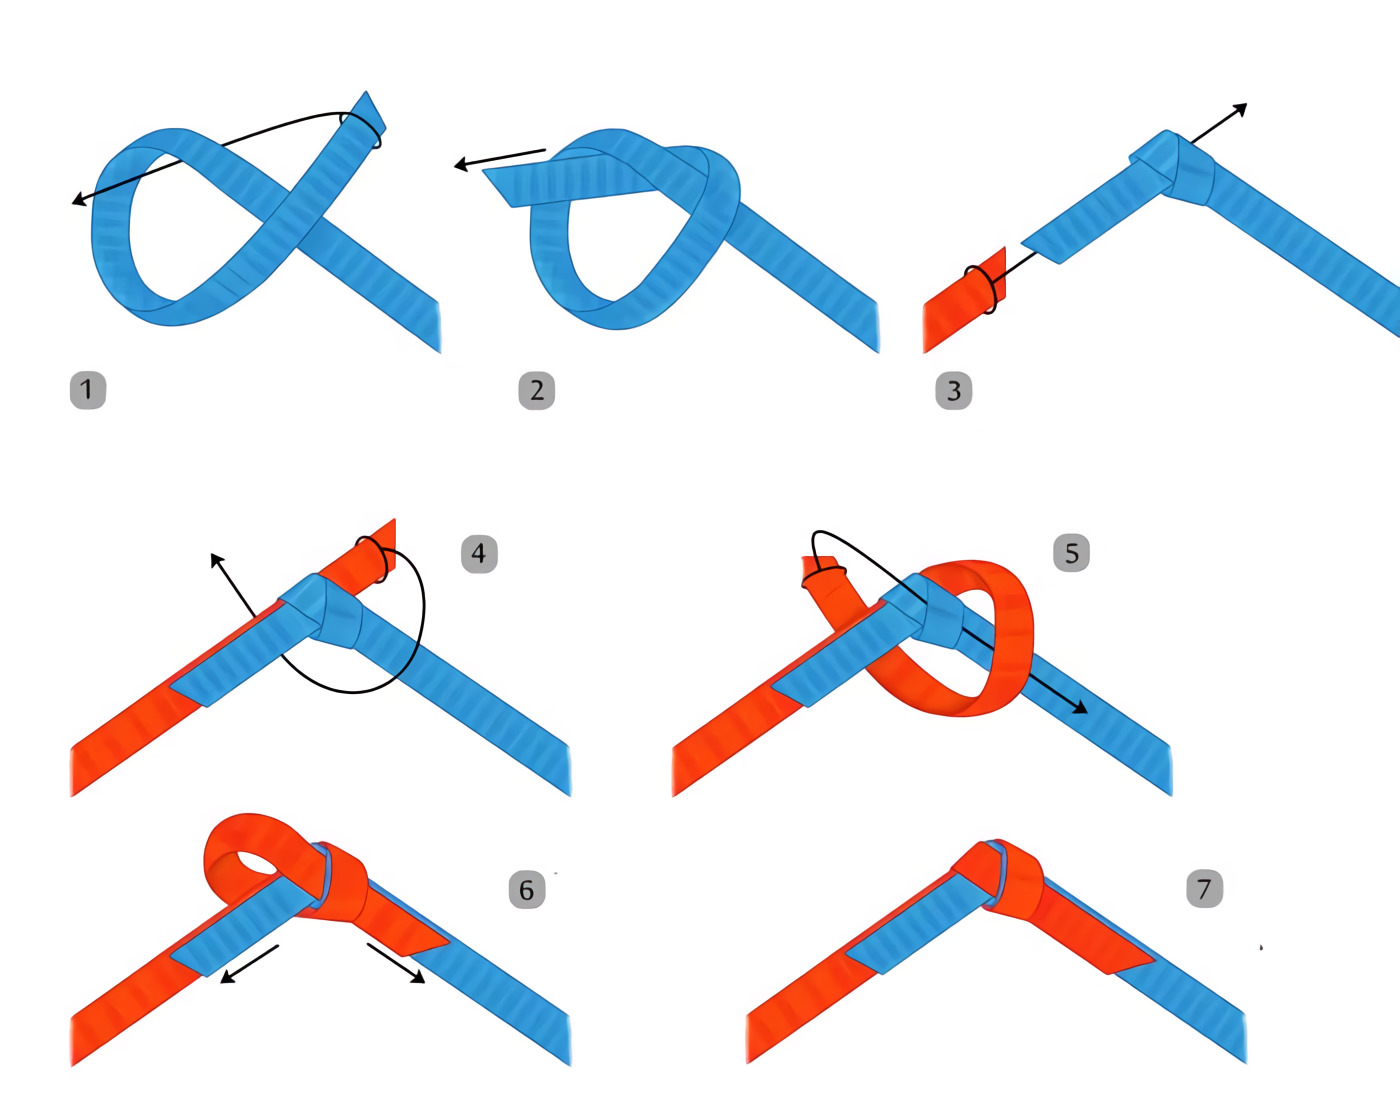
9. WATER KNOT
The water knot is used to safely secure flat belts, webbing, and many types of straps together. To do this type of knot, you begin by making a loose overhand knot at the end of one strap. Pass the other strap by going in an opposite direction so that it copies the route of the overhand knot of your first strap. Tighten the knot by taking the end of the two straps.
10. THE ROLLING HITCH
This type of knot acts as an extension of an existing line; it is also the precursor of a basic knot behind the taut-line hitch and can be added to any current line. It is used in hooking more dogs to the mainline of the dog sled.
To do this type of knot, you can wrap the free end of one string so that you create a half hitch. Make another half hitch and wrap the entire knot over and finish it using a half hitch on the other side from where you started.
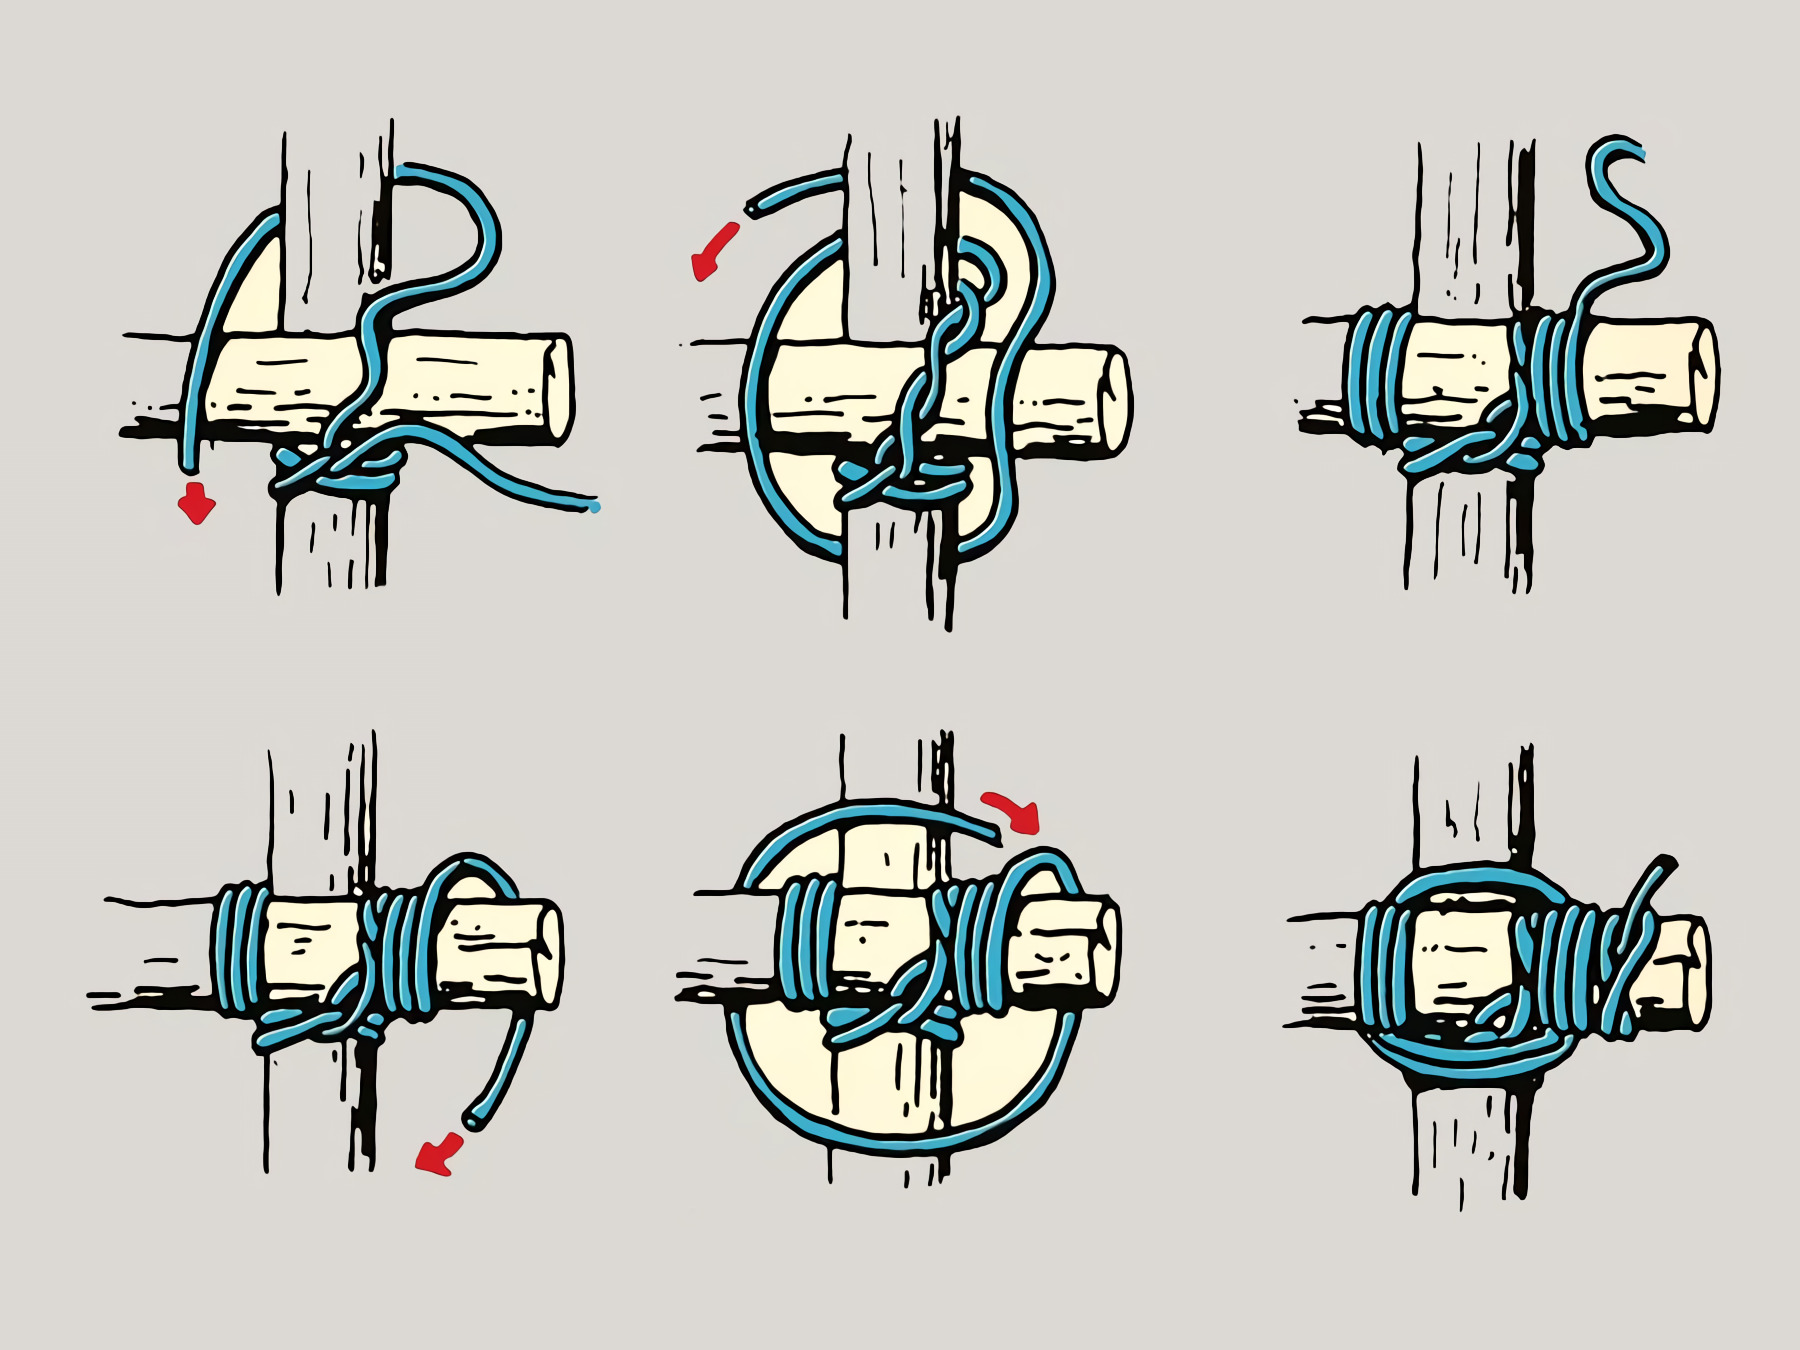
11. SQUARE LASHING
The square lashing is used in building many things from camp chairs to bridges and towers and even securing two poles together.
To create this knot, make a clove hitch first to one of the poles, near where two poles intersect. Wrap the cable around the junction of these two poles by going under it first then over. Do these wraps about five to six times. Next, wrap the cord between the poles. Let it bite on the wrappings so that you could tighten them. Then create a square knot to tie the free end of the cable to the other open end from the clove hitch that started it all.
12. TRIPOD LASHING
This knot is used as support for camp items like a cooking pot over a fire or for shelters. To do the tripod lashing, you need to collect three poles of identical thickness and length and lay them side-by-side. Tie a clove hitch on one of the end poles wrapping the cable around four to six times.
Wrap the cord between the poles twice between the poles and work your way back to the original hitch created. Finish the lashing by tying the tag end of the line to the tag end of the original knot. When you spread the legs of the tripod, you have created and what you have is now something handy.

13. SHEEPSHANK
The sheepshank looks like a magic trick and a half practical knot. It shortens the line without cutting the line. To do a sheepshank, you need to fold the cord in the length you want. Make a half hitch on one end of the remaining rope and drop it over the adjacent loop. Make a half hitch on the opposite end and drop it over this loop and tauten the whole object slowly.

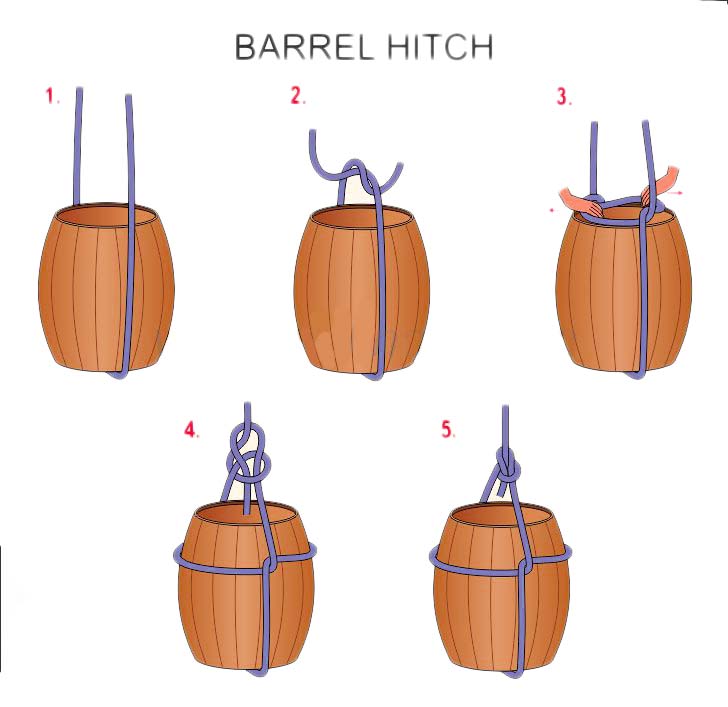
14. THE BARREL HITCH
This type of knot is used frequently in construction and sailing. If you want to secure a barrel, bucket of other cylindrical things and lift them securely, then choose this knot.
To do this knot, you need to place the barrel or another object at the top of the rope. Do an overhand knot until it wraps around the top side of the cylindrical object. Fasten the ends of the rope together using a square knot and then lift.
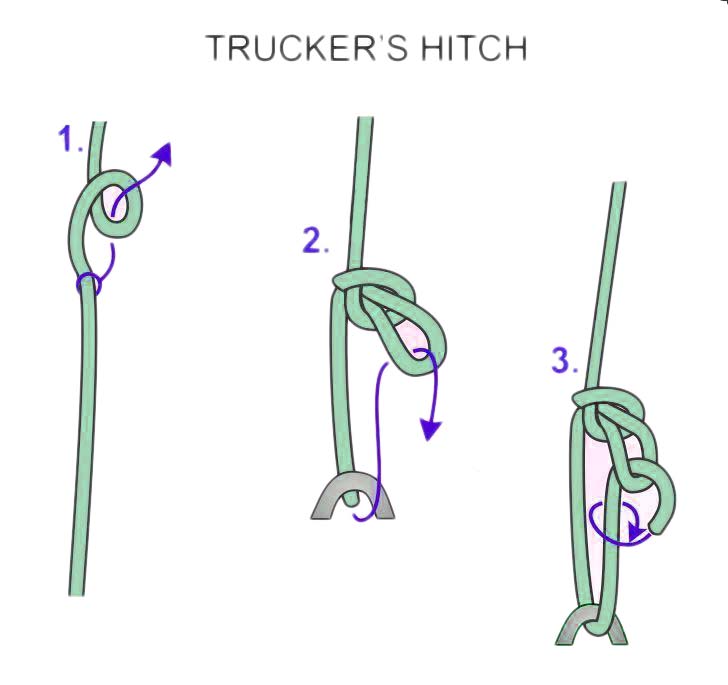
15. THE TRUCKER HITCH
This rugged hitch is not only used by truckers but in normal circumstances as well. Its unique characteristic is it can give a mechanical advantage in tightening up the rope. Doing this knot is a little complicated, but it is worth the effort if you need a tighter knot.
To tie the trucker’s hitch, you need to start by tying a figure 8 knot using the rope. Pass the free end of the rope around whatever you are attaching the rope to while passing the line through a loop. Pull the working end to tighten and secure its free end using two half-hitches.
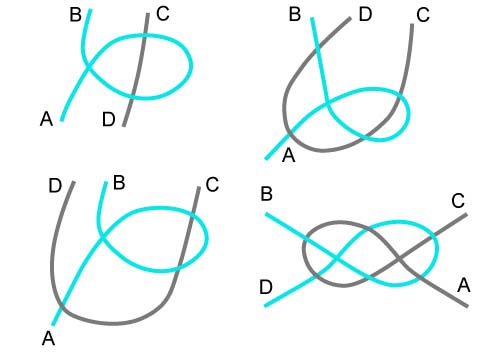
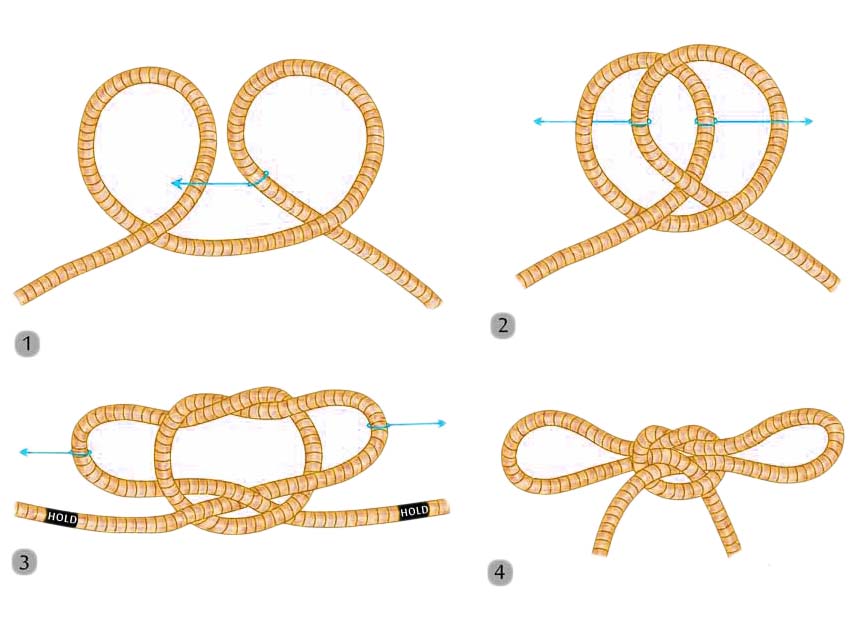
16. CARRICK BEND
This knot is an alternative to a square knot in joining two ropes together securely. It is also easier to untie it compared to a square knot.
To create a Carrick Bend, you need to form a loop with the free end of the string. Pass the open end of the string under the first loop and then do it over and under. String the free end across the ring, letting it pass under itself. Pull both the standing ends of the string to tighten.
17. MAN HARNESS
The man harness knot allows you to put a ring anywhere in the length of the rope when either of them is free to tie a ring.
To make this knot, you have to make a ring so that part of the line can run through the center of the loop. Grip the side of the ring and pull this through the gap between the line in the center and the other side of the circle. You have now a new loop, pull it tight and draw the line to strap the man harness knot. This type of knot can slip without a constant tension on the new loop; you need to put something on the loop to keep it from slipping.
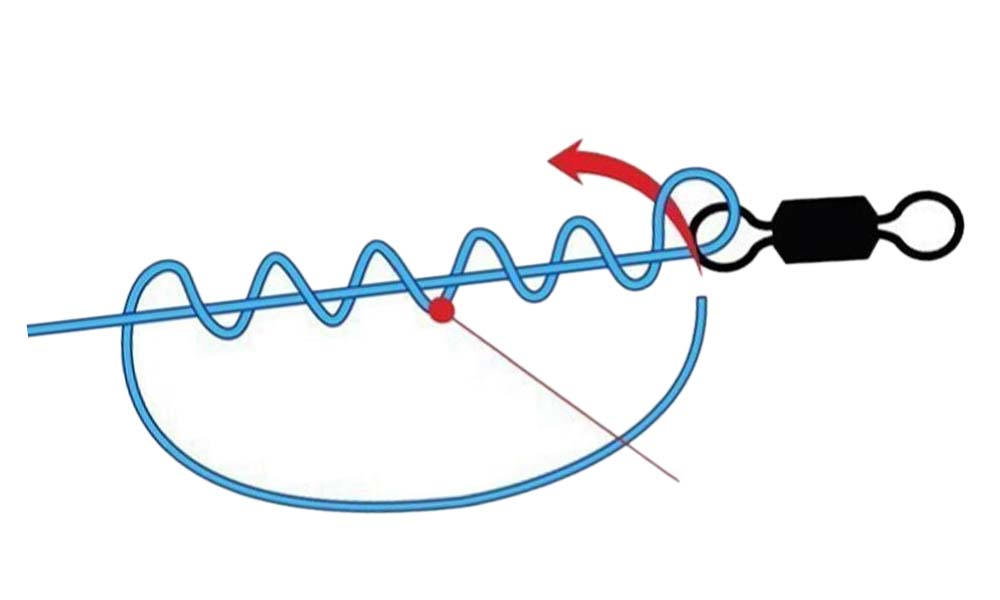
18. THE BLOOD KNOT
This type of knot is used mostly on fishing lines to secure two cords together.
To create this knot, you have to start by wrapping the free end around the other rope about five or six times. You will form an overlap between the two lines. Pass the open end of the cord between the two lines. Wrap the other line in the same manner and insert the free end in between the two lines in the reverse direction of the separate line that is free.
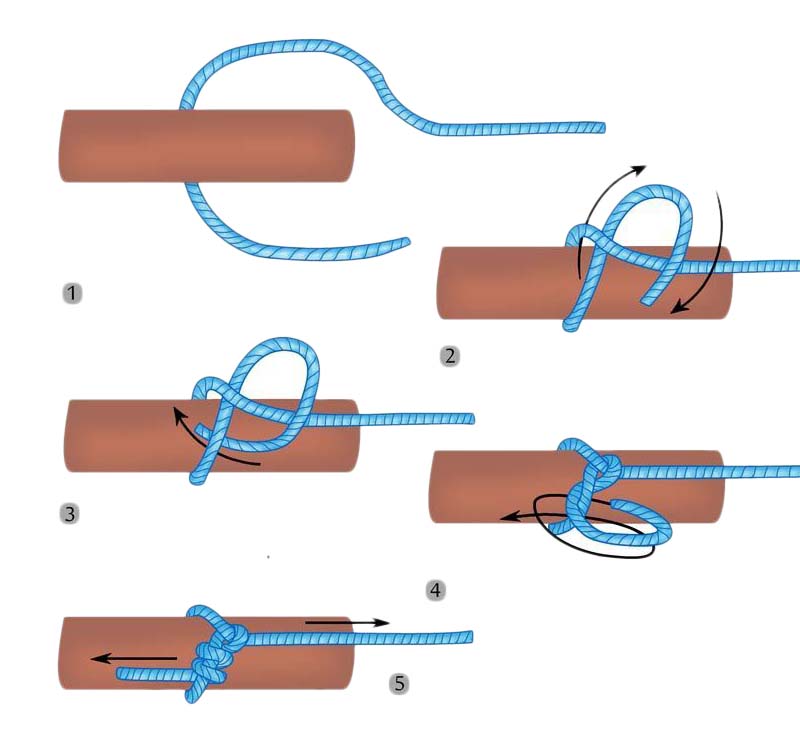
19. THE TIMBER HITCH
The timber hitch is a knot used to secure a rope to an object as a support or for hauling. Creating a timber hitch is easy. You only need to run a cord around the object that you want to pull. Wrap the tag end of the cable around the inside of the ring you have created about four or five times and tighten.
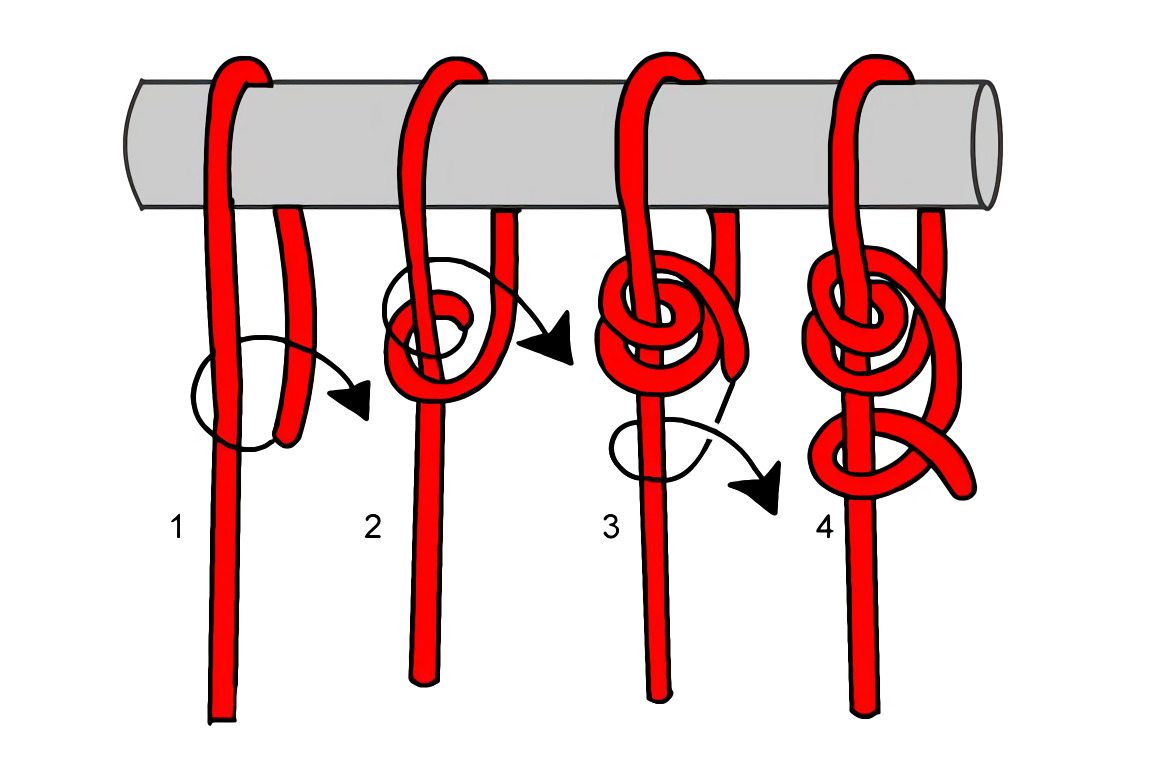
20. PRUSIK KNOT
The Prusik Knot makes a ring that you can use as a descender or ascender, which is handy when you want to add a ring to a rope when neither of them is free.
To make this knot, you will need to make a loop on a shorter rope, securing it with a square knot. Wrap the ring around the long cord about three times, making sure that each wrap is flat against the long rope.
Pass the loop on the short rope under itself and tighten it. As long as there is a weight on the loop, the Prusik will tend to grasp the long rope. Alternatively, you can slide the Prusik Knot up and down the cord if you take the weight off and pushing the wraps along the length of the long rope.